redux探索:rematch
作者:高天阳
邮箱:[email protected]
更改历史

* 2019-08-22        高天阳    初始化文档
1. 背景
redux存在的问题
- 项目中redux的样板文件太分散,书写和维护都比较麻烦
- 使用thunk来处理异步操作,不是那么直观
2. 快速开始
npm install @rematch/core
2.1. Init
init 用来配置你的 reducers, devtools & store。
index.js
import { init } from '@rematch/core'
import * as models from './models'

const store = init({
  models,
})
2.2. Models
该model促使state, reducers, async actions 和 action creators 放在同一个地方。
models.js
export const count = {
  state: 0, // initial state
  reducers: {
    // handle state changes with pure functions
    increment(state, payload) {
      return state + payload
    }
  },
  effects: {
    // handle state changes with impure functions.
    // use async/await for async actions
    async incrementAsync(payload, rootState) {
      await new Promise(resolve => setTimeout(resolve, 1000))
      this.increment(payload)
    }
  }
}
查看reducer文档以了解更多信息,包括如何从其他 modal 触发 actions。
理解模型与回答几个问题一样简单:
- 我的初始 state 是什么? state
- 我如何改变 state? reducers
- 我如何处理异步 action? effects with async/await
2.3. Dispatch
dispatch 是我们如何在你的model中触发 reducers 和 effects。 Dispatch 标准化了你的action,而无需编写action types 或者 action creators。
import { dispatch } from '@rematch/core'

                                                  // state = { count: 0 }
// reducers
dispatch({ type: 'count/increment', payload: 1 }) // state = { count: 1 }
dispatch.count.increment(1)                       // state = { count: 2 }

// effects
dispatch({ type: 'count/incrementAsync', payload: 1 }) // state = { count: 3 } after delay
dispatch.count.incrementAsync(1)                       // state = { count: 4 } after delay
Dispatch 能被直接调用,或者用 dispatch[model][action](payload)简写。
2.4. View
import React from 'react'
import ReactDOM from 'react-dom'
import { Provider, connect } from 'react-redux'
import store from './index'

const Count = props => (
  <div>
    The count is {props.count}
    <button onClick={props.increment}>increment</button>
    <button onClick={props.incrementAsync}>incrementAsync</button>
  </div>
)

const mapState = state => ({
  count: state.count
})

const mapDispatch = ({ count: { increment, incrementAsync }}) => ({
  increment: () => increment(1),
  incrementAsync: () => incrementAsync(1)
})

const CountContainer = connect(mapState, mapDispatch)(Count)

ReactDOM.render(
  <Provider store={store}>
    <CountContainer />
  </Provider>,
  document.getElementById('root')
)
3. API
import { init } from '@rematch/core';
const store = init({
models: {
count: {
state: 0,
reducers: {
add: (state, payload) => state + payload,
del: (state, payload) => state - payload,
'otherModel/actionName': (state, payload) => state + payload,
},
effets: {
async loadData(payload, rootState) {
const response = await fetch('http://example.com/data')
const data = await response.json()
this.add(data)
}
}
},
list: {}
},
redux: {
reducers: {},
middlewares: [thunk],
},
plugins: [loading]
})
3.1. init
对rematch进行初始化,返回一个store对象,包含了使用redux初始化store对象的所有字段。
3.2. models: { [string]: model }
一个对象,属性的键作为rootState上的的键
3.3. model.state: any
用来初始化model
3.4. model.reducers: { [string]: (state, payload) => any }
一个对象,属性是用来改变model state的方法,第一个参数是这个model的上一个state, 第二个参数是payload,函数返回model下一个state。这些方法应该是纯函数。
3.5. model.effects: { [string]: (payload, rootState) }
一个对象,异步或者非纯函数的方法放在这个对象中,可以与async/await一起使用
3.6. redux
通过这个属性,可以兼容老项目中的redux配置。
3.7. plugins
rematch是一个插件系统,通过这个字段可以配置第三方的插件。
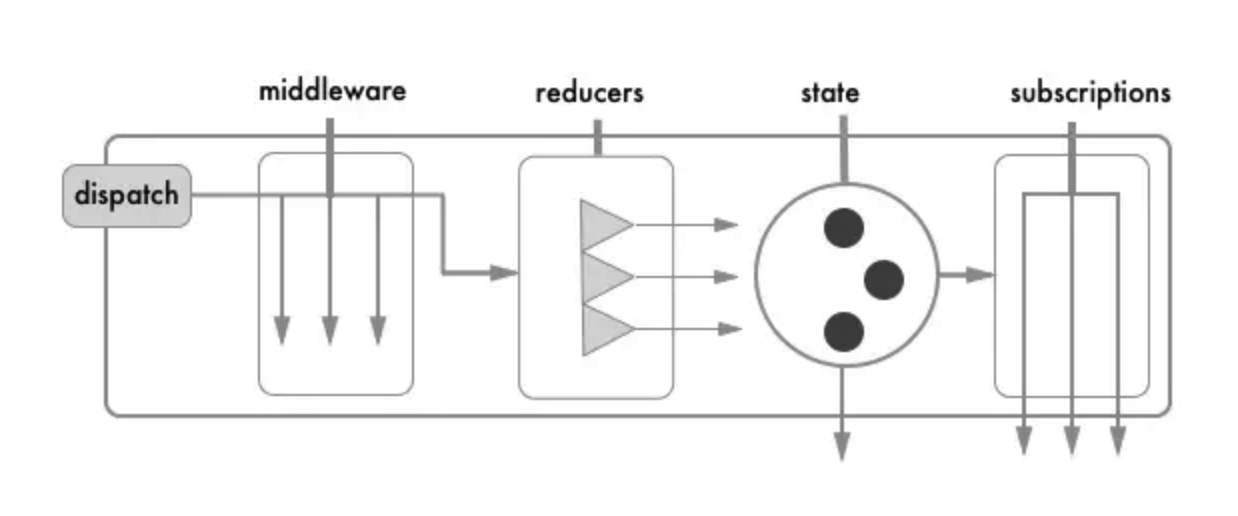
redux流程:
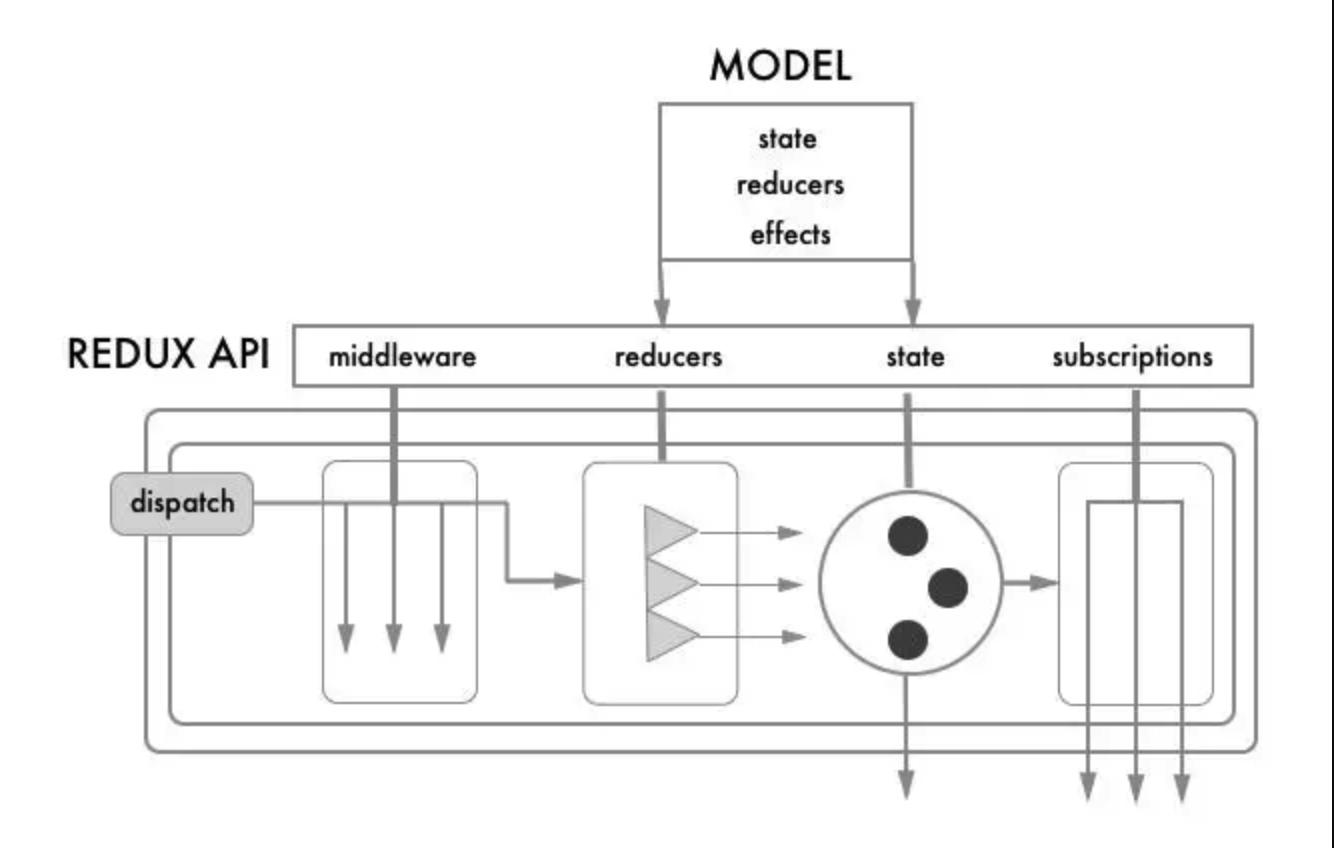
rematch流程:
4. 示例
4.1. 简单示例
index.js
import React from 'react'
import ReactDOM from 'react-dom'
import { Provider } from 'react-redux'
import { init } from '@rematch/core'
import App from './App'
const count = {
state: 0,
reducers: {
increment: s => s + 1,
},
effects: dispatch => ({
async asyncIncrement() {
await new Promise(resolve => {
setTimeout(resolve, 1000)
})
dispatch.count.increment()
},
}),
}
const store = init({
module: {
count,
}
})
// Use react-redux's <Provider /> and pass it the store.
ReactDOM.render(
<Provider store={store}>
<App />
</Provider>,
document.getElementById('root')
)
App.js
import React from 'react'
import { connect } from 'react-redux'
// Make a presentational component.
// It knows nothing about redux or rematch.
const App = ({ count, asyncIncrement, increment }) => (
<div>
<h2>
count is <b style={{ backgroundColor: '#ccc' }}>{count}</b>
</h2>
<h2>
<button onClick={increment}>Increment count</button>{' '}
<em style={{ backgroundColor: 'yellow' }}>(normal dispatch)</em>
</h2>
<h2>
<button onClick={asyncIncrement}>
Increment count (delayed 1 second)
</button>{' '}
<em style={{ backgroundColor: 'yellow' }}>(an async effect!!!)</em>
</h2>
</div>
)
const mapState = state => ({
count: state.count,
})
const mapDispatch = dispatch => ({
increment: dispatch.count.increment,
asyncIncrement: dispatch.count.asyncIncrement,
})
// Use react-redux's connect
export default connect(
mapState,
mapDispatch
)(App)
4.2. 复杂数据结构
一般来讲state中的数据结构是以对象的形式存储的,因为不只存储一个数据,那么例子需要作出适当调整
index.js
import React from 'react';
import ReactDOM from 'react-dom';
import { Provider } from 'react-redux';
import { init } from '@rematch/core';
import App from './App';
const count = {
  state: {
    num: 0,
    flag: true,
    flagShow: true
  },
  reducers: {
    increment: (state, payload) => {
      return {
        ...state,
        num: payload
      }
    },
    toggle: (state, payload) => {
      return {
        ...state,
        flag: payload
      }
    },
    toggleShow: (state, payload) => {
      return {
        ...state,
        flagShow: payload
      }
    },
  },
  effects: dispatch => ({
    async asyncIncrement(s) {
      // 需要处理数据可在这里进行处理
      s = ++s
      await new Promise(resolve => {
        setTimeout(resolve, 1000)
      })
      dispatch.count.increment(s)
    },
  }),
}
const store = init({
    models: {
        count
    }
})
// Use react-redux's <Provider /> and pass it the store.
ReactDOM.render(
    <Provider store={store}>
        <App />
    </Provider>,
document.getElementById('root')
)
app.js
import React from 'react';
import { connect } from 'react-redux'
import { Componet } from './componet';
class App extends React.Component {
// 需要初始化本模块state的时候通过constructor
// constructor(props) {
// super(props)
// }
increment () {
this.props.increment(this.props.count.num + 1)
}
asyncIncrement () {
this.props.asyncIncrement(this.props.count.num + 1)
}
// if切换
toggle () {
this.props.toggle(!this.props.count.flag)
}
// show 切换
toggleShow () {
this.props.toggleShow(!this.props.count.flagShow)
}
// 子组件传值
handleClick (msg, name) {
console.log('子组件传回父组件')
console.log(msg, name);
}
// 通过匿名函数绑定this
// handleClick = (msg, name) => {
// console.log('子组件传回父组件')
// console.log(msg, name);
// }
render() {
return (
<div>
<h2>
count is <b style={{backgroundColor: '#ccc'}}>{this.props.count.num}</b>
</h2>
<h2>
<button onClick={this.increment.bind(this)}>增加count</button>
{' '}
<em style={{backgroundColor: 'yellow'}}>(normal dispatch)</em>
</h2>
<h2>
<button onClick={this.asyncIncrement.bind(this)}>
Increment count (delayed 1 second)
</button>
{' '}
<em style={{backgroundColor: 'yellow'}}>(an async effect!!!)</em>
</h2>
<h2>
<button onClick={this.toggle.bind(this)}>类v-if实现</button>
<button onClick={this.toggleShow.bind(this)}>类v-show实现</button>
{' '}
<em style={{backgroundColor: 'yellow'}}>(normal dispatch)</em>
</h2>
<h2>
{'v-if当前值'}{this.props.count.flag ? 'true' : 'false'}
</h2>
<h2>
{'v-show当前值'}{this.props.count.flagShow ? 'true' : 'false'}
</h2>
<Componet
title="仿v-if、v-show"
msg="仿v-if、v-show"
v-if={this.props.count.flag}
v-show={this.props.count.flagShow}
onClick={this.handleClick.bind(this)}
// 通过匿名函数绑定this
// onClick={this.handleClick}
/>
</div>
)
}
}
const mapState = state => ({
count: state.count,
})
const mapDispatch = dispatch => ({
increment: dispatch.count.increment,
toggle: dispatch.count.toggle,
toggleShow: dispatch.count.toggleShow,
asyncIncrement: dispatch.count.asyncIncrement,
})
export default connect(
mapState,
mapDispatch
)(App)
仿v-if、v-show效果展示
component.js
import React, { Component } from 'react';

let name = 'zhangsan';
let msg = {
    name: 'zhangsan',
    age: 1212
};
export const Componet = (props) => {
    // console.log(props);
    if (props['v-if']) {
        let isShow = props['v-show'] ? 'block' : 'none';
        return (
            // 通过匿名函数绑定this
            // <ul onClick={props.onClick.bind(this, msg, name)} style={{display: isShow}} >
            <ul onClick={()=>props.onClick(msg, name)} style={{display: isShow}} >
                <li>${name}</li>
                <li>${props.title}</li>
                <li>${props.msg}</li>
                <li>zhangsan</li>
            </ul>
        );
    } else {
        return (<div></div>);
    }
};
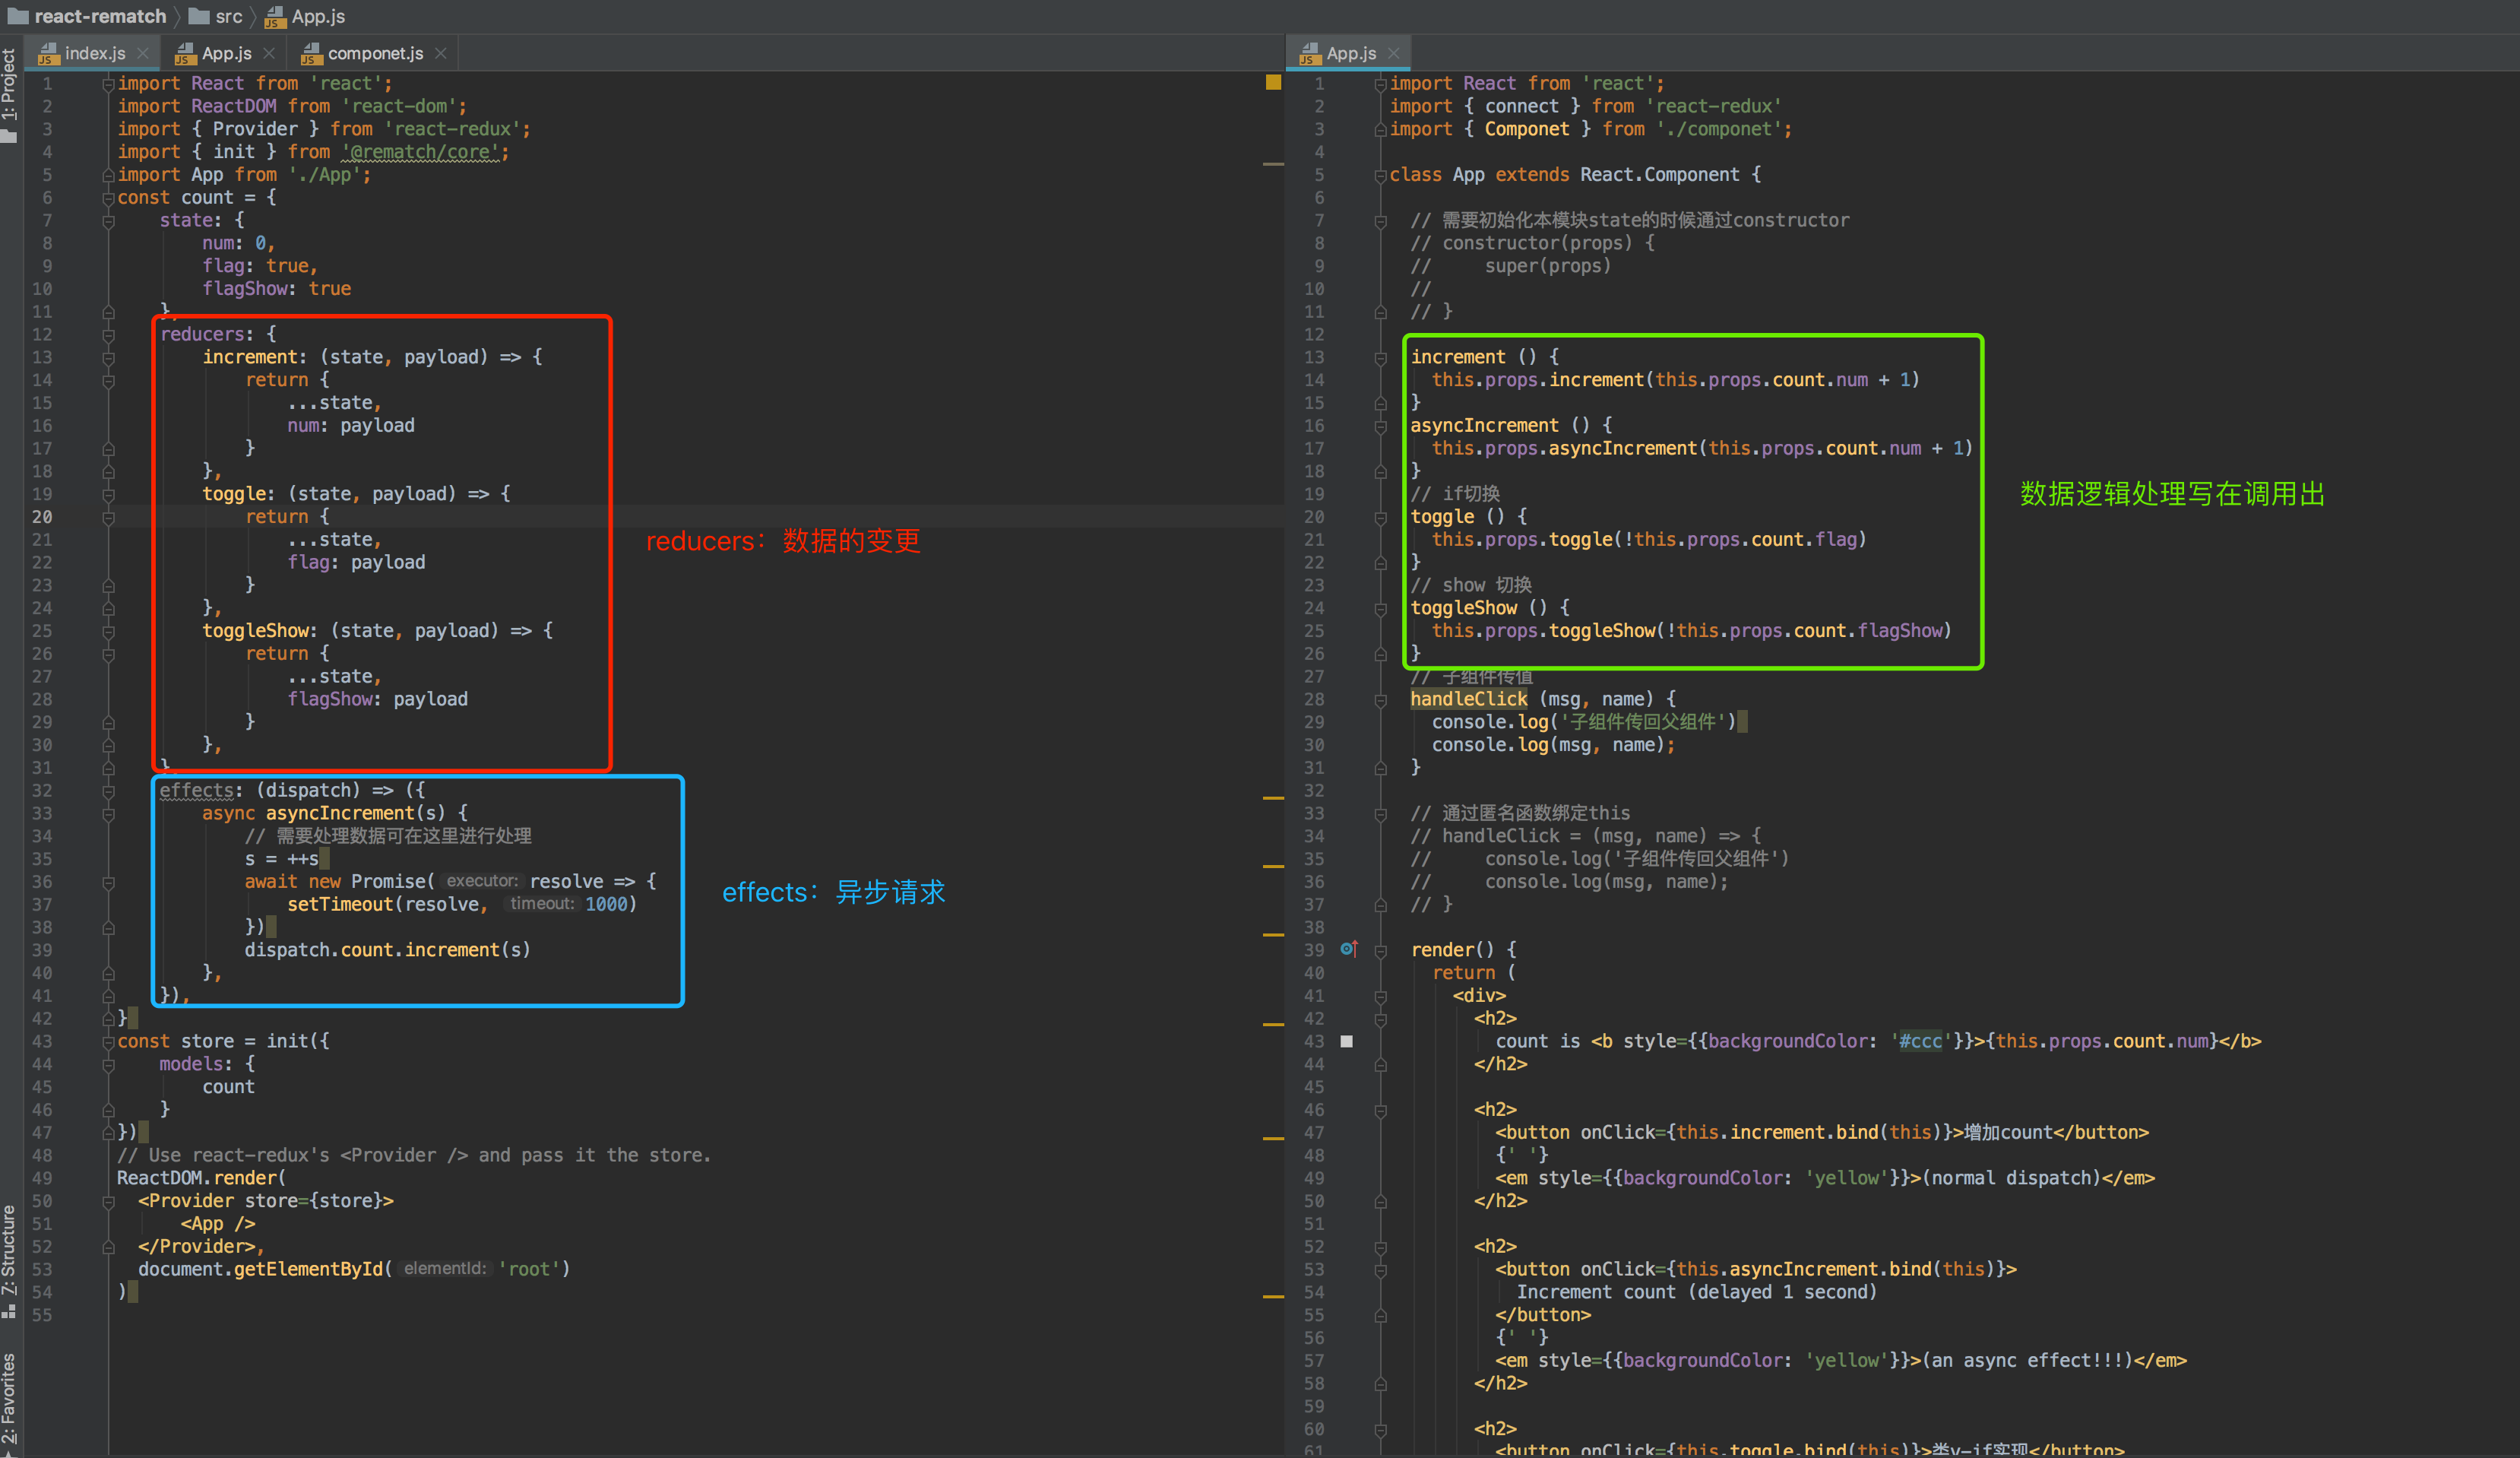
rematch功能划分
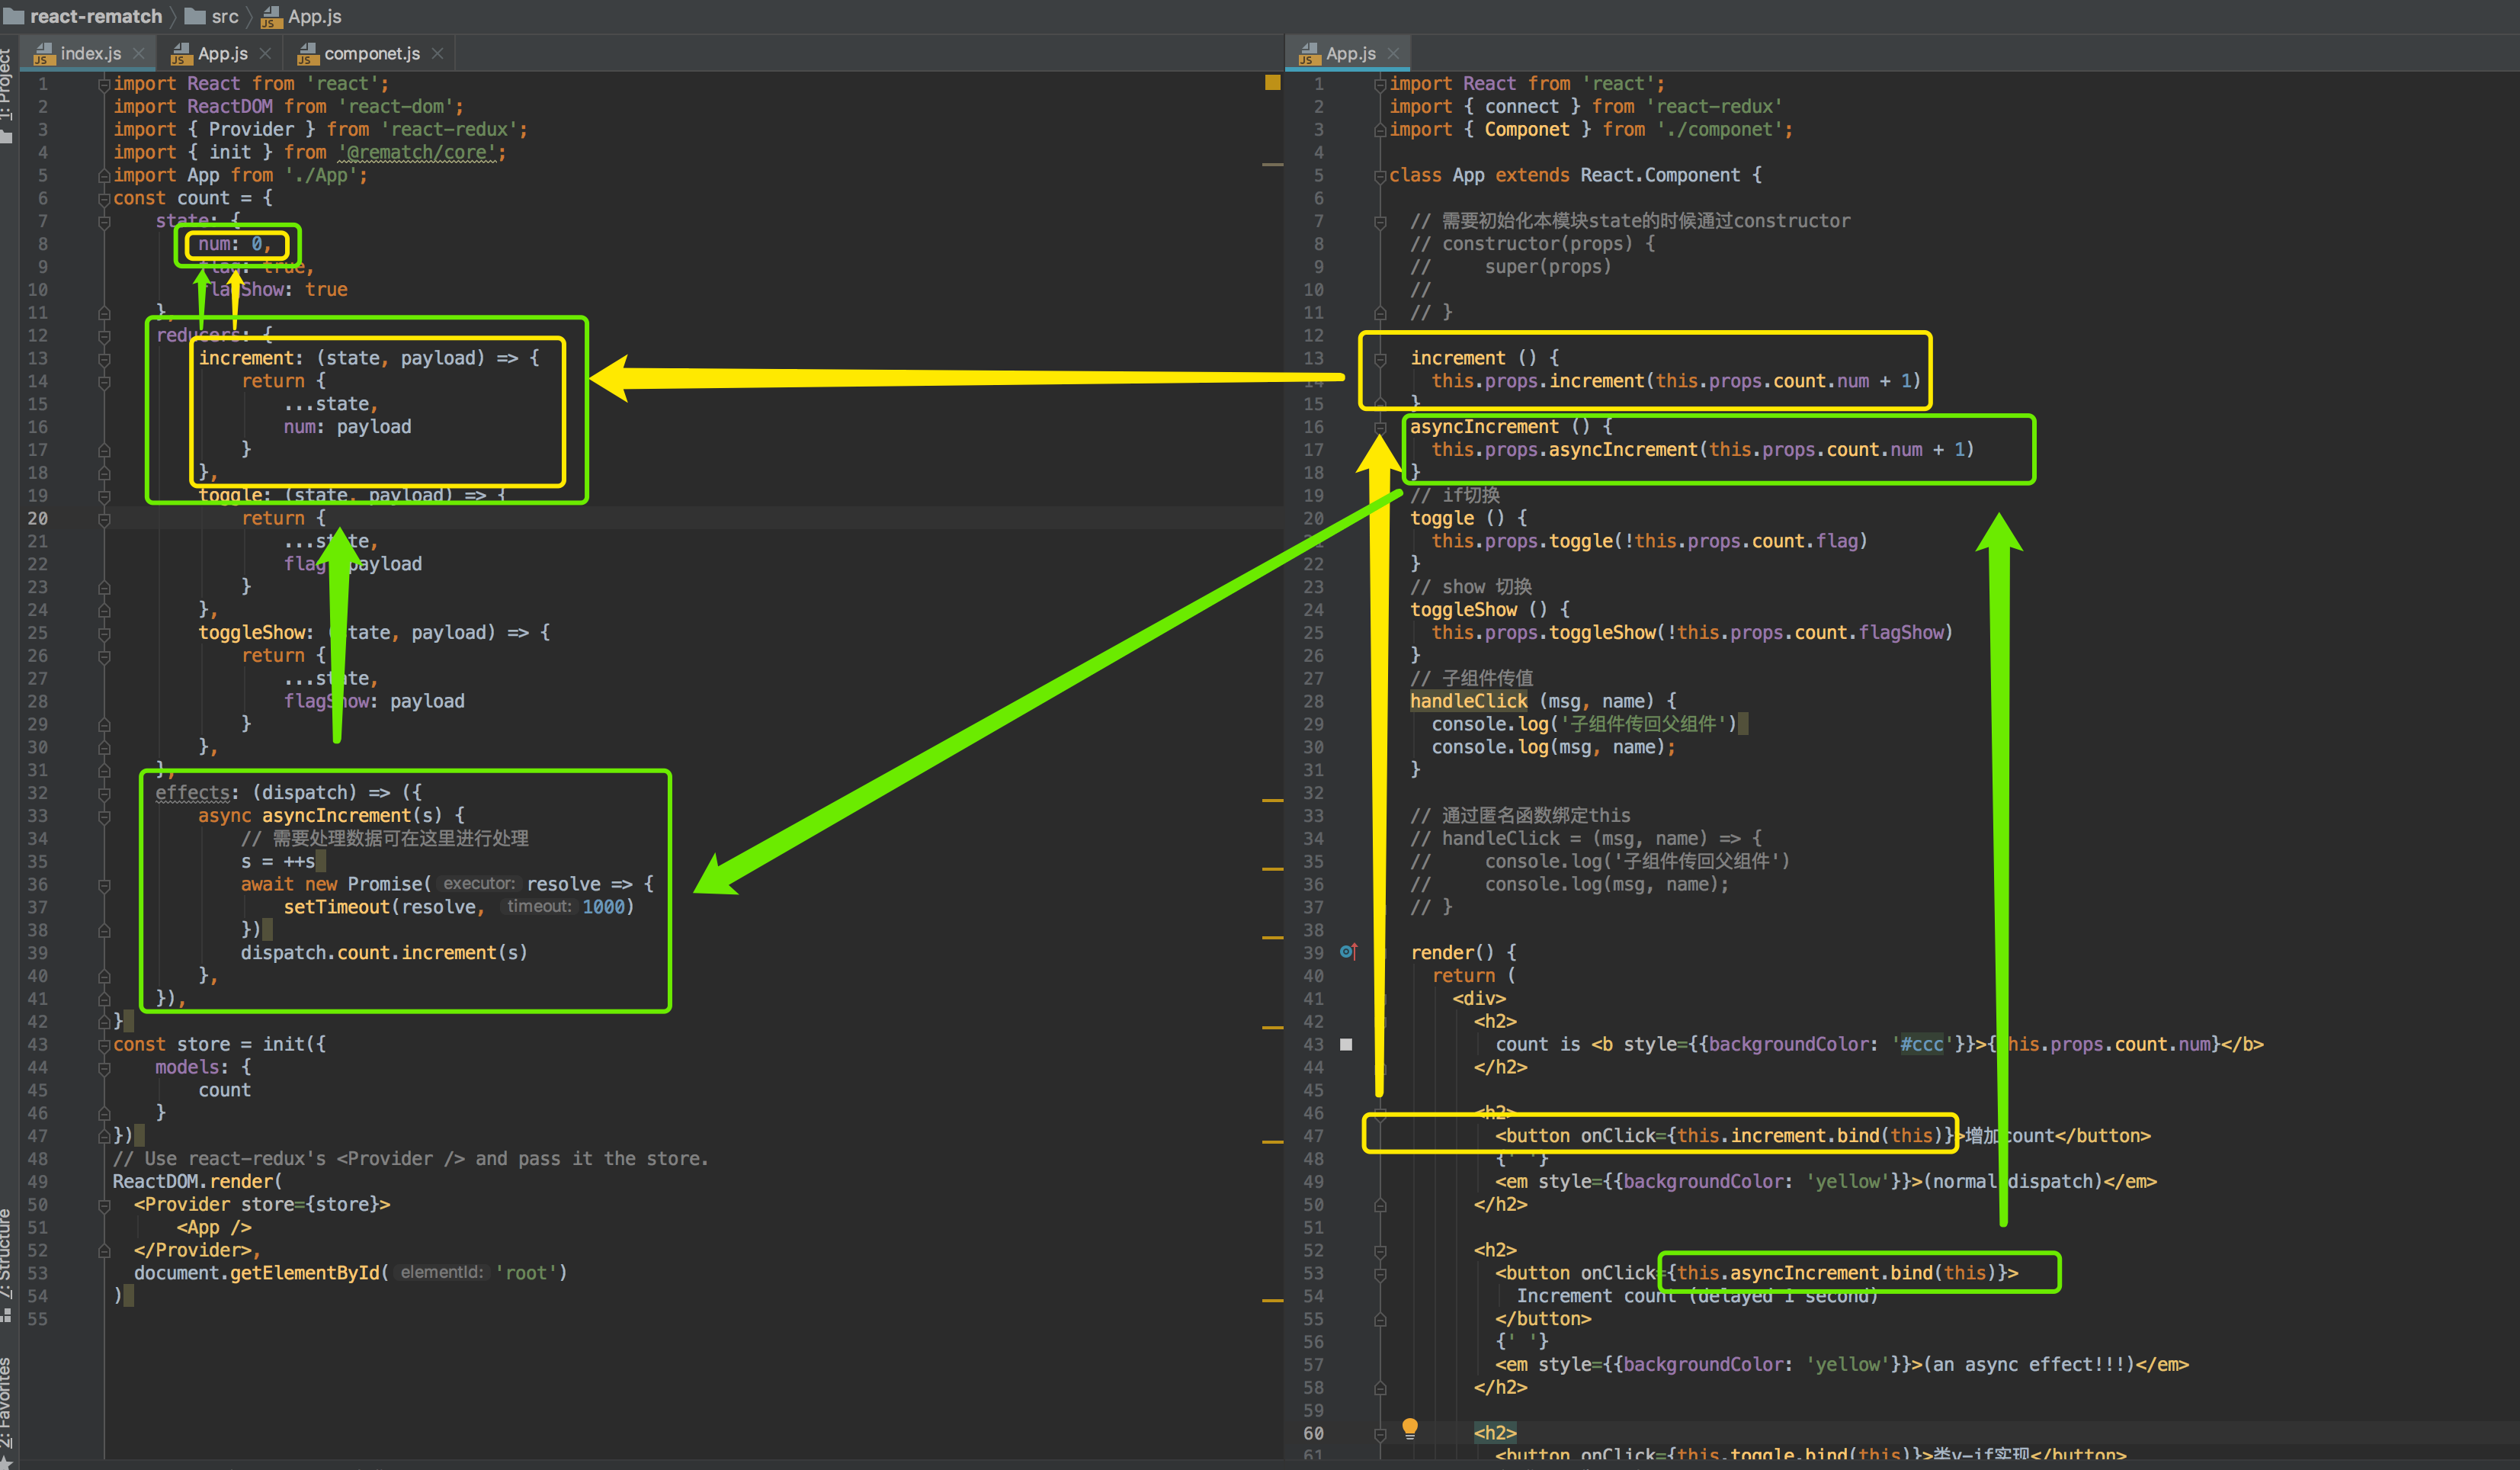
rematch流程走向
5. 最佳实践
5.1. 业务逻辑实现
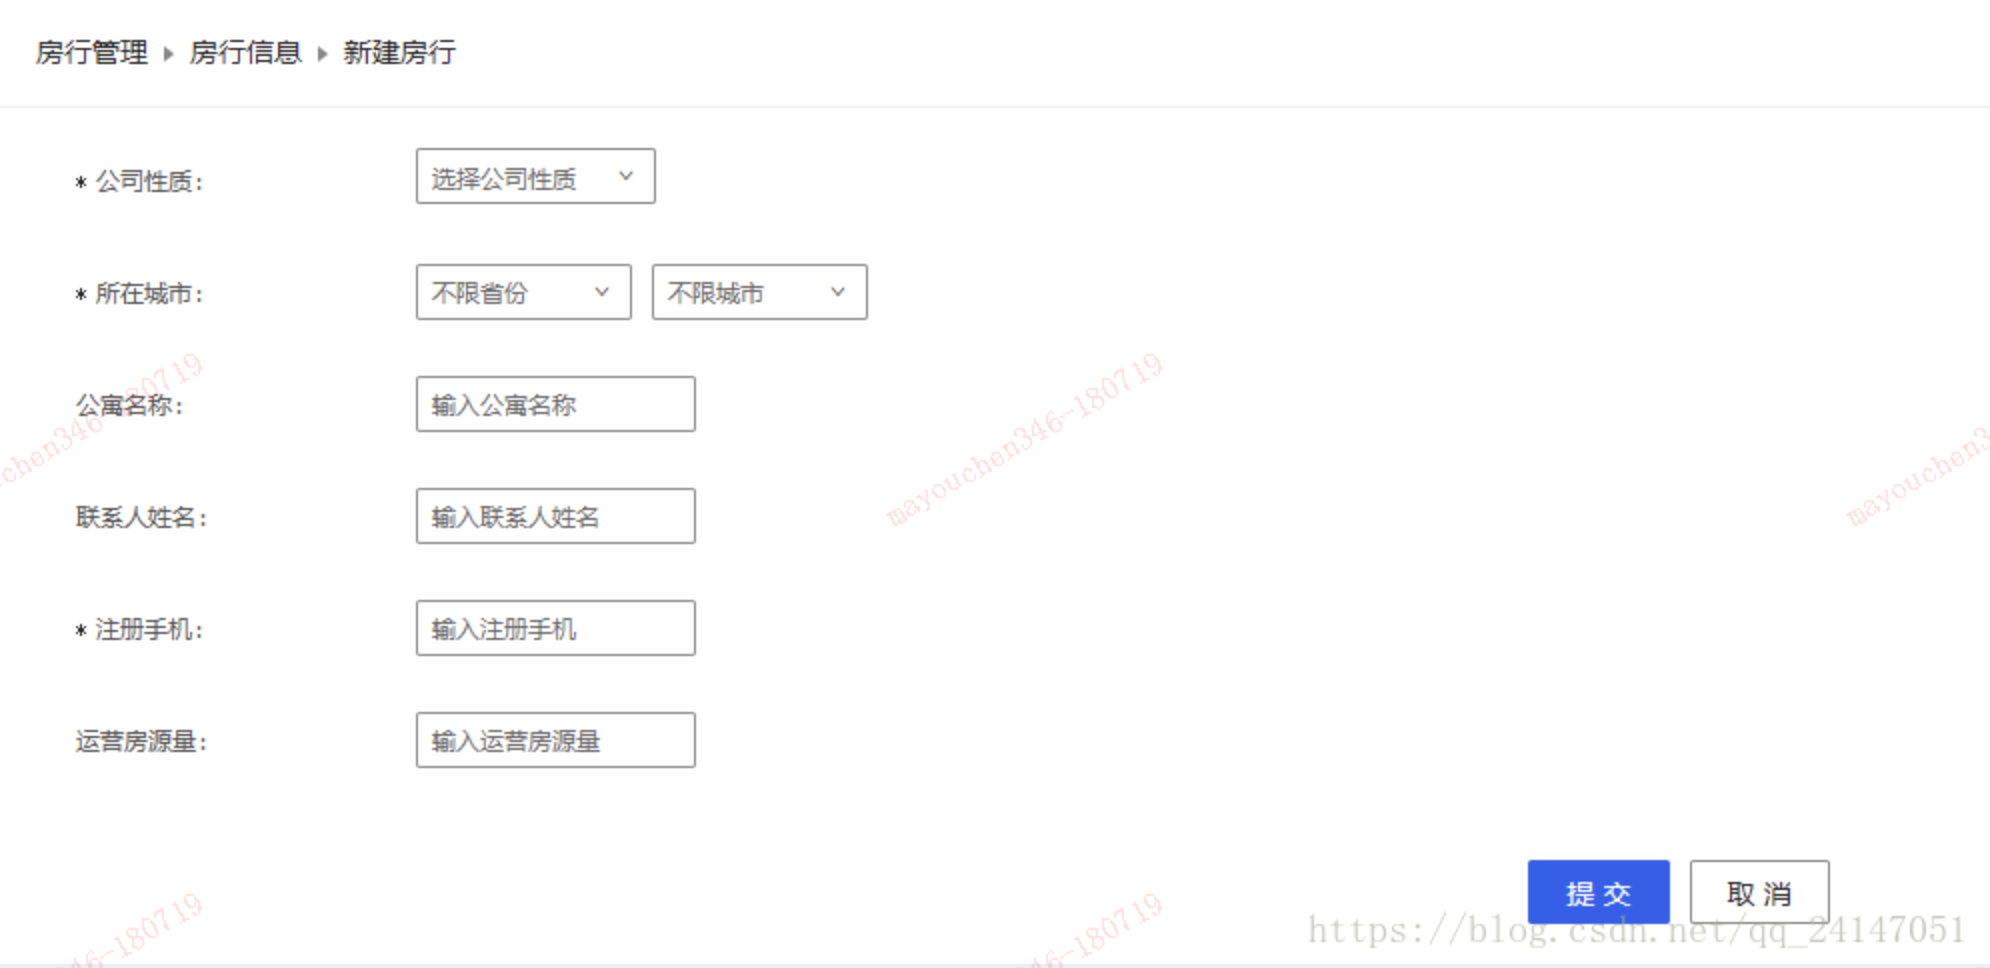
如下图所示,当选择公司性质为 “默认” 或者 “个人” 时候 ‘公司全称’字段是隐藏。当我们选择公司性质为“公司”时 ‘公司全称’字段展示。
默认状态:
公司性质为“公司”
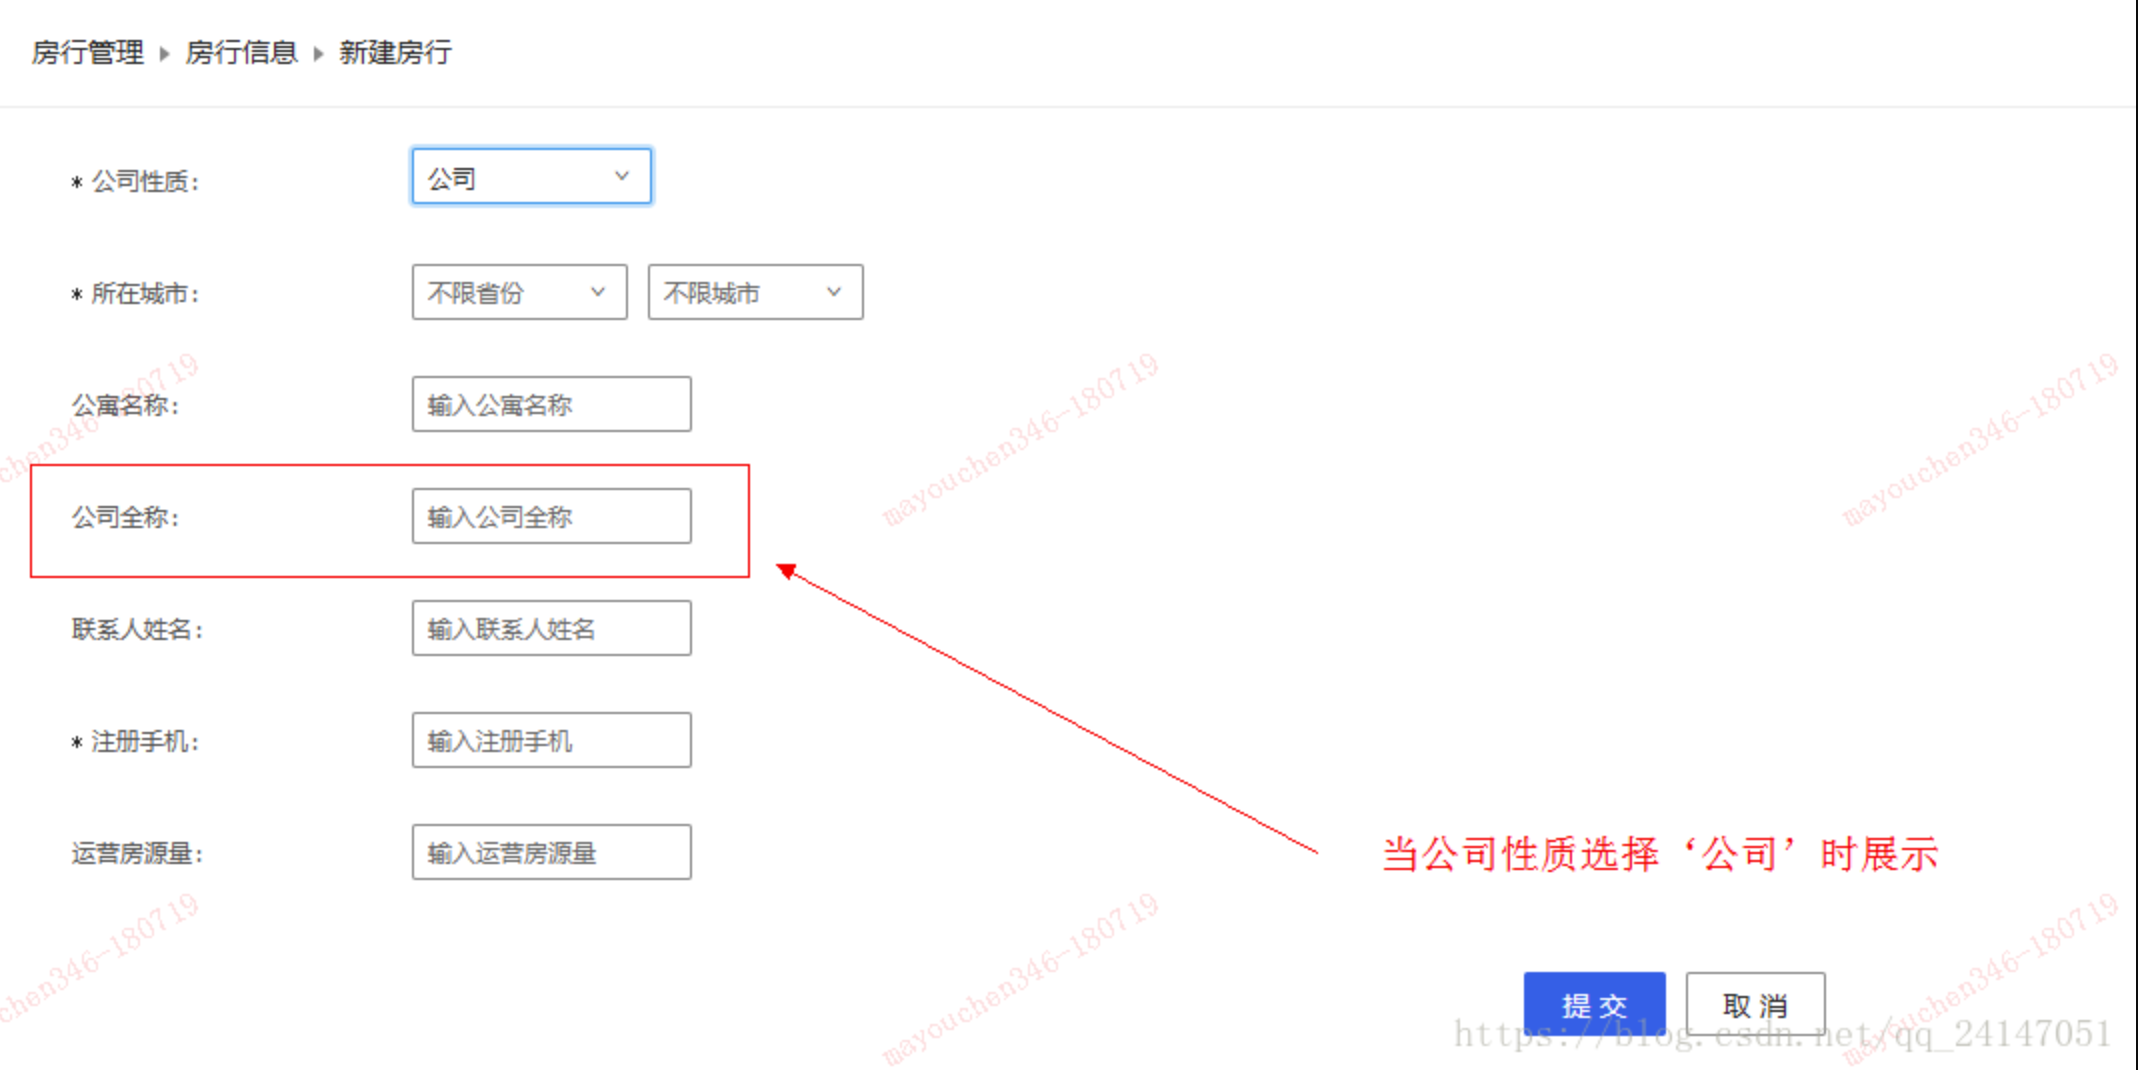
这个功能该如何实现呢?
思路:
- 在‘公司性质’这个 select框上面绑定一个 onchange事件,每次变化 获取到当前select框 对应的值。
- 将获取到当前select框的值写一个接口去调用它(如果使用react, 则在 reducer里面定义),并将每次返回的值在传递给前端页面;
- 根据接口返回的select的值来对应显示“公司性质”的显示或者隐藏。
代码如下:
newEdit.js — view层 — 父组件
import Form from './components/basicForm';

onSwitchAccountCategory = (value) => {  /*将从接口获取到的数据子组件 ,这里传递了所有的props数据,和一个函数onSwitchAccountCategory ,传递的函数用于从子组件获取到select框的值传递给父组件*/
  this.props.dispatch({
    type: `${this.module}/switchAccountCategory`,
    payload: value
  });
}

buildForm = (props) => {
  return (
    <Form  {...props}  onSwitchAccountCategory={this.onSwitchAccountCategory} />
  );
}
basicForm.js — view层—子组件
import { FormInputField } from 'components/common';

 render = () => {

 let { entity } = this.props;

 return (
  <Form>
    <FormInputField
      getFieldDecorator={getFieldDecorator}
      label="公司性质"
      fieldProps={{style: {width: 120 }, onChange: this.props.onSwitchAccountCategory}} /*onChange 方法 */
      field="accountCategory"
      fieldDecoratorOptions={
        {
          rules: [
            {
              required: true,
              message:'请选择公司性质'
            }
          ],
          validateTrigger: ['onSubmit']
        }
      }
      entity={entity}
      datasource={CompanyNature.toArray().map(item => ({ text: item.text, id: item.value }))}
      type="select"/>

    /*---------------------------------------------------------------------------------------*/
      /* 将获取的select框的值转换,判断是否等于公司来控制其 显示 或者 隐藏*/
    {
     CompanyNature.getAliasFromValue(entity.accountCategory) === '公司' &&
      <FormInputField
      getFieldDecorator={getFieldDecorator}
      label="公司全称"
      field="companyName"
      required={false}
      fieldDecoratorOptions={
        {
          rules: [
            {
              required: false,
              whitespace: true,
              message: "请输入公司全称"
            },
            {
              validator: this.verifyCompanyName,
            }
          ],
          validateTrigger: ['onSubmit']
        }
      }
      entity={entity}
      key="companyName"/>}
 </Form>)
)
edit.js — Model层
reducers: {
    switchAccountCategory(state, action) {  //切换公司性质
      return {
        ...state,
        entity: {
          ...state.entity,
          accountCategory: action.payload   /* 将获取到的select框的值传递给view层 */
        }
      };
    },
  }
5.2. 老项目接入
主要针对已经使用thunk中间键的老项目。
安装依赖,并删除依赖中的redux
yarn add @rematch/core
yarn remove redux (删除redux可能会造成eslint报错)
修改redux入口文件
src/store/index.js
import { init } from '@rematch/core';
import thunk from 'redux-thunk';
import reduxReducerConfig from '@/reducers';
import models from '../models';
const store = init({
models,
redux: {
reducers: {
...reduxReducerConfig
},
middlewares: [thunk],
},
});
export default store;
修改reducers的入口文件
import { routerReducer as routing } from 'react-router-redux';
- import { combineReducers } from 'redux';
import dispatchConfigReducer from './dispatch-config';
import counterReducer from './count';
- export default combineReducers({
- routing,
- dispatchConfigReducer,
- counterReducer,
- });
+ export default {
+ routing,
+ dispatchConfigReducer,
+ counterReducer,
+ };
增加model的入口文件
+ src/models
+ src/models/re-count.js
+ src/models/config-list.js
+ src/models/index.js
index.js
import reCount from './re-count';
import configList from './config-list';
export default {
reCount,
configList,
};
如果老项目中没有使用redux,可以使用yarn remove thunk删除thunk的依赖和reducers这个文件夹,
并且在init初始化的时候可以不用传redux这个配置。如果接入rematch,需要锁定版本,
rematch中引入的redux版本为4.0.0,所以老项目中的
5.3. 新项目配置
index.js
import React from 'react';
import { render } from 'react-dom';
import { browserHistory, Router } from 'react-router';
import { syncHistoryWithStore } from 'react-router-redux';
import { Provider } from 'react-redux';
import routes from '@/routes';
import store from '@/store';
import '@/styles/index.less';
const history = syncHistoryWithStore(browserHistory, store);
render(
<Provider store={store}>
<Router history={history} routes={routes} />
</Provider>,
document.getElementById('root'),
);
---------------------------------------------------------------------------------------
// 新建store文件夹,并添加index.js
import { init } from '@rematch/core';
import { routerReducer as routing } from 'react-router-redux';
import models from '../models';
const store = init({
models,
redux: {
reducers: {
routing,
},
},
});
export default store;
---------------------------------------------------------------------------------------
// 新建models文件夹,并添加index
models结构
├── common
│ ├── bizLineList.js
│ └── index.js
└── index.js
5.4. bug
Redux DevTools 要升级到最新版,2.16.0有bug
6. 同类技术比较
基于redux数据流的管理方案:Dva、mirror和rematch
6.1. Dva
Dva是蚂蚁金服开源的一个数据流管理方案,基于redux和redux-saga,简化了开发体验。 Dva是一揽子的解决方案,可以使用侵入性很强的dva-cli来快速搭建项目,提供了路由层面的适配; 也可以使用dva-core来引入核心的代码,减少侵入性。
缺点
- 如果使用Dva的一整套框架,现有的项目会有较大的改动
- Dva使用redux-saga来处理异步,学习成本比较高
6.2. mirror
mirror类似于Dva的一个redux数据流方案,最新一次更新在两个月之前,一直没有发布1.0的版本
6.3. rematch
rematch的灵感来自于Dva和mirror,将两者的有点结合了起来。
优点
- 使用了类似Dva的model文件结构,统一管理同步和异步操作
- 通过中间键实现了async/await的方式来处理异步,舍弃了Dva中的redux-saga
- 提供了redux的配置项,可以兼容项目中的老代码
- 支持多个store
缺点
- 将model中reducers和effects的方法挂载在dispatch函数上,造成dispatch既是一个函数,又是一个对象
| Rematch | Mirror | Dva | |
|---|---|---|---|
| 适用框架 | 所有框架 / 不使用框架 | React | React |
| 适用路由 | 所有路由 / 不使用路由 | RR4 | RR3, RR4 / 不使用路由 |
| 移动端 | √ | x | √ |
| 开发者工具 | Redux, Reactotron | Redux | Redux |
| 插件化 | √ | √ | √ |
| reducers | √ | √ | √ |
| effects | async/await | async/await | redux saga |
| effect params | (payload, internals) | (action, state) | (action, state) |
| 监听方式 | subscriptions | hooks | subscriptions |
| 懒加载模型 | √ | √ | √ |
| 链式 dispatch | √ | √ | √ |
| 直接 dispatch | √ | ||
| dispatch promises | √ | √ | |
| 加载插件 | √ | √ | √ |
| persist plugin | √ | ||
| package size | 14.9k(gzipped: 5.1k) redux + thunk: 6k(2k) |
130.4k(gzipped: 33.8k) | dva-core: 72.6k(gzipped: 22.5k) |