GitBook更多配置
作者:高天阳
邮箱:[email protected]
更改历史

* 2019-07-24        高天阳    初始化文档
1. 全局配置
配置根目录下book.json文件
1.1. title 设置书本的标题
“title” : “私人笔记”
1.2. author 作者的相关信息
“author” : “gaotianyang”
1.3. description 本书的简单描述
“description” : “gaotianyang的私人笔记”
1.4. language Gitbook使用的语言
版本2.6.4中可选的语言如下:
en, ar, bn, cs, de, en, es, fa, fi, fr, he, it, ja, ko, no, pl, pt, ro, ru, sv, uk, vi, zh-hans, zh-tw
例如,配置使用简体中文
“language” : “zh-hans”
1.5. links 在左侧导航栏添加链接信息
{
    "links": {
        "sidebar": {
            "Home": "https://www.baidu.com"
        }
    }
}
1.6. styles 自定义页面样式
{
    "styles": {
        "website": "styles/website.css",
        "ebook": "styles/ebook.css",
        "pdf": "styles/pdf.css",
        "mobi": "styles/mobi.css",
        "epub": "styles/epub.css"
    }
}
例如使h1 h2标签有下划线, 可以在website.css中设置
h1 , h2{
    border-bottom: 1px solid #EEEEEE;
}
2. plugins 插件列表
2.1. 配置使用的插件
{
    "plugins": [
        "-search",
        "back-to-top-button",
        "expandable-chapters-small",
        "insert-logo"
    ]
}
其中"-search"中的 - 符号代表去除默认自带的插件
Gitbook默认自带有5个插件:
- highlight:代码高亮
- search:导航栏查询功能(不支持中文)
- sharing:右上角分享功能
- font-settings:字体设置(最上方的"A"符号)
- livereload:为GitBook实时重新加载
2.2. 插件属性配置pluginsConfig
配置插件的属性
例如配置insert-logo的属性:
{
    "pluginsConfig": {
        "insert-logo": {
            "url": "images/logo.png",
            "style": "background: none; max-height: 30px; min-height: 30px"
        }
    }
}
3. 一些实用插件
记录一些实用的插件
用法:在book.json中添加以下内容。然后执行gitbook install,
或者使用NPM安装(单独安装推荐NPM)npm install gitbook-plugin-插件名,
也可以从源码GitHub地址中下载,放到node_modules文件夹里(GitHub地址在进入插件地址右侧的GitHub链接)
3.1. back-to-top-button 回到顶部
在book.json中添加以下内容。然后执行gitbook install,
或者使用NPM安装(单独安装推荐NPM)npm install gitbook-plugin-back-to-top-button,
也可以从源码GitHub地址中下载,放到node_modules文件夹里(GitHub地址在进入插件地址右侧的GitHub链接)
{
    "plugins": [
         "back-to-top-button"
    ]
}
3.2. Prism 回到顶部
使用 Prism.js 为语法添加高亮显示,需要将 highlight 插件去掉。该插件自带的主题样式较少,
可以再安装 prism-themes 插件,里面多提供了几种样式,具体的样式可以参考这里,
在设置样式时要注意设置 css 文件名,而不是样式名。
在book.json中添加以下内容。然后执行gitbook install,
或者使用NPM安装(单独安装推荐NPM)npm install gitbook-plugin-prism,
也可以从源码GitHub地址中下载,放到node_modules文件夹里(GitHub地址在进入插件地址右侧的GitHub链接)
{
    "plugins": [
            "prism",
            "-highlight"
        ],
    "pluginsConfig": {
        "prism": {
            "css": [
                "prism-themes/themes/prism-base16-ateliersulphurpool.light.css"
            ]
        }
    }
}
如果需要修改背景色、字体大小等,可以在 website.css 定义 pre[class*="language-"] 类来修改,下面是一个示例:
pre[class*="language-"] {
    border: none;
    background-color: #f7f7f7;
    font-size: 1em;
    line-height: 1.2em;
}
3.3. 导航目录折叠
chapter-fold 左侧目录折叠
支持多层目录,点击导航栏的标题名就可以实现折叠扩展。
在book.json中添加以下内容。然后执行gitbook install,
或者使用NPM安装(单独安装推荐NPM)npm install gitbook-plugin-chapter-fold,
也可以从源码GitHub地址中下载,放到node_modules文件夹里(GitHub地址在进入插件地址右侧的GitHub链接)
{
    "plugins": [
         "chapter-fold"
    ]
}
expandable-chapters-small 左侧章节目录可折叠
支持多层目录,比Toggle Chapters好用 只有点击箭头才能实现折叠扩展。不如【2.2.1. chapter-fold 左侧目录折叠】好用
在book.json中添加以下内容。然后执行gitbook install,
或者使用NPM安装(单独安装推荐NPM)npm install gitbook-plugin-expandable-chapters-small,
也可以从源码GitHub地址中下载,放到node_modules文件夹里(GitHub地址在进入插件地址右侧的GitHub链接)
{
    "plugins": [
         "expandable-chapters-small"
    ]
}
expandable-chapters 可扩展导航章节
和expandable-chapters-small效果相同,唯一不同的是这个插件的箭头粗
在book.json中添加以下内容。然后执行gitbook install,
或者使用NPM安装(单独安装推荐NPM)npm install gitbook-plugin-expandable-chapters,
也可以从源码GitHub地址中下载,放到node_modules文件夹里(GitHub地址在进入插件地址右侧的GitHub链接)
{
    "plugins": [
         "expandable-chapters"
    ]
}
3.4. 代码复制,行号
code 代码添加行号&复制按钮(可选)
为代码块添加行号和复制按钮,复制按钮可关闭
单行代码无行号。
在book.json中添加以下内容。然后执行gitbook install,
或者使用NPM安装(单独安装推荐NPM)npm install gitbook-plugin-code,
也可以从源码GitHub地址中下载,放到node_modules文件夹里(GitHub地址在进入插件地址右侧的GitHub链接)
{
    "plugins": [
         "code"
    ]
}
如果想去掉复制按钮,在book.json的插件配置块更新:
{
    "plugins" : [ "code" ],
    "pluginsConfig": {
          "code": {
          "copyButtons": false
      }
    }
}
copy-code-button 代码块复制按钮
为代码块添加复制的按钮。
在book.json中添加以下内容。然后执行gitbook install,
或者使用NPM安装(单独安装推荐NPM)npm install gitbook-plugin-copy-code-button,
也可以从源码GitHub地址中下载,放到node_modules文件夹里(GitHub地址在进入插件地址右侧的GitHub链接)
{
    "plugins": [
         "copy-code-button"
    ]
}
效果如下图所示

3.5. todo 待做项☑
添加 Todo 功能。默认的 checkbox 会向右偏移 2em,如果不希望偏移,可以在 website.css 里加上下面的代码:
input[type=checkbox]{
    margin-left: -2em;
}
在book.json中添加以下内容。然后执行gitbook install,
或者使用NPM安装(单独安装推荐NPM)npm install gitbook-plugin-todo,
也可以从源码GitHub地址中下载,放到node_modules文件夹里(GitHub地址在进入插件地址右侧的GitHub链接)
{
    "plugins": ["todo"]
}
使用示例:
*   [ ]  write some articles
*   [x]  drink a cup of tea
3.6. Terminal
模拟终端显示,主要用于显示命令以及多行输出,不过写起来有些麻烦。
在book.json中添加以下内容。然后执行gitbook install,
或者使用NPM安装(单独安装推荐NPM)npm install gitbook-plugin-terminal,
也可以从源码GitHub地址中下载,放到node_modules文件夹里(GitHub地址在进入插件地址右侧的GitHub链接)
{
  "plugins": [
      "terminal"
  ],
  "pluginsConfig": {
      "terminal": {
          "copyButtons": true,
          "fade": false,
          "style": "flat"
      }
  }
}
现在支持 6 种标签:
- command: Command "executed" in the terminal.
- delimiter: Sequence of characters between the prompt and the command.
- error: Error message.
- path: Directory path shown in the prompt.
- prompt: Prompt of the user.
- warning: Warning message.
标签的使用格式如下所示:
**[<tag_name> 内容]
效果如下
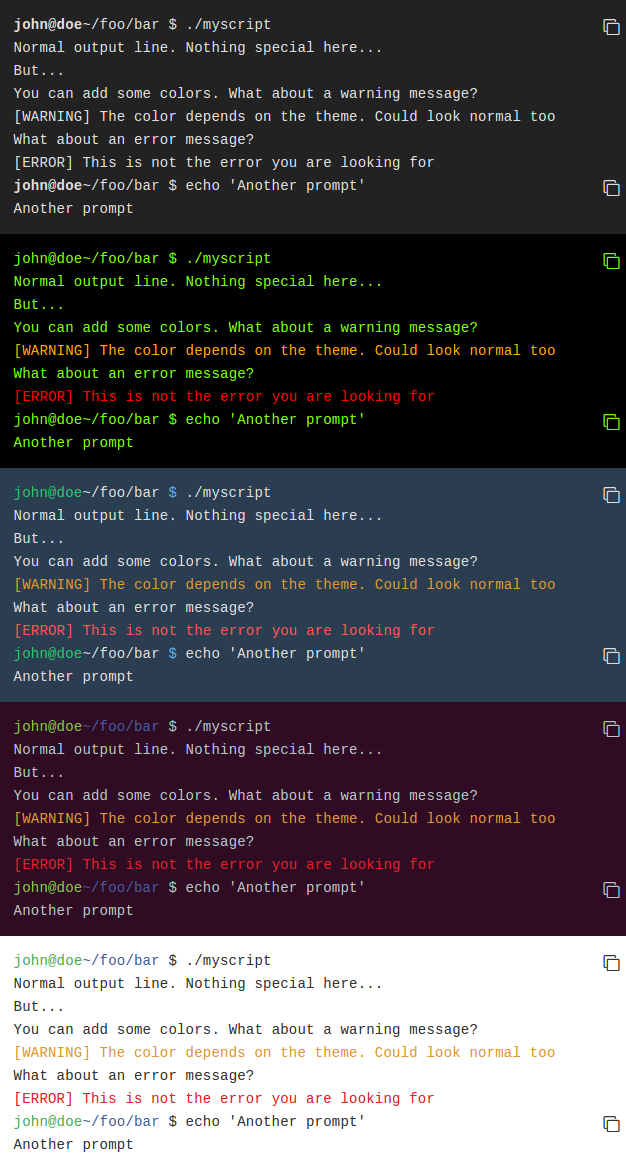
为了使标签正常工作,需要在代码块的第一行加入 **[termial] 标记,下面是一个完整的示例:
效果如下所示:
Ps:不知是否是版本或者是插件冲突的原因 显示有异常 不能换行显示
**[terminal]
**[prompt foo@joe]**[path ~/foo/bar]**[delimiter  $ ]**[command ./myscript]
Normal output line. Nothing special here...
But...
You can add some colors. What about a warning message?
**[warning [WARNING] The color depends on the theme. Could look normal too]
What about an error message?
**[error [ERROR] This is not the error you are looking for]
terminal 支持下面 5 种样式,如果需要更换样式,在 pluginsConfig 里配置即可。
- black: Just that good old black terminal everybody loves.
- classic: Looking for green color font over a black background? This is for you.
- flat: Oh, flat colors. I love flat colors. Everything looks modern with them.
- ubuntu: Admit it or not, but Ubuntu have a good looking terminal.
- white: Make your terminal to blend in with your GitBook.
3.7. insert-logo 插入logo
将logo插入到导航栏上方中
在book.json中添加以下内容。然后执行gitbook install,
或者使用NPM安装(单独安装推荐NPM)npm install gitbook-plugin-insert-logo,
也可以从源码GitHub地址中下载,放到node_modules文件夹里(GitHub地址在进入插件地址右侧的GitHub链接)
{
  "plugins": [
       "insert-logo"
  ],
  "pluginsConfig": {
    "insert-logo": {
      "url": "images/logo.png",
      "style": "background: none; max-height: 30px; min-height: 30px"
    }
  }
}
3.8. 搜索
search-pro 高级搜索(支持中文)
在book.json中添加以下内容。然后执行gitbook install,
或者使用NPM安装(单独安装推荐NPM)npm install gitbook-plugin-search-pro,
也可以从源码GitHub地址中下载,放到node_modules文件夹里(GitHub地址在进入插件地址右侧的GitHub链接)
{
    "plugins": [
         "-lunr", "-search", "search-pro"
    ]
}
search-plus 高级搜索(支持中文)
在book.json中添加以下内容。然后执行gitbook install,
或者使用NPM安装(单独安装推荐NPM)npm install gitbook-plugin-search-plus,
也可以从源码GitHub地址中下载,放到node_modules文件夹里(GitHub地址在进入插件地址右侧的GitHub链接)
{
    "plugins": [
         "-lunr", "-search", "search-plus"
    ]
}
3.9. advanced-emoji 支持emoji表情
在book.json中添加以下内容。然后执行gitbook install,
或者使用NPM安装(单独安装推荐NPM)npm install gitbook-plugin-advanced-emoji,
也可以从源码GitHub地址中下载,放到node_modules文件夹里(GitHub地址在进入插件地址右侧的GitHub链接)
{
    "plugins": [
        "advanced-emoji"
    ]
}
3.10. github 在右上角添加github图标
在book.json中添加以下内容。然后执行gitbook install,
或者使用NPM安装(单独安装推荐NPM)npm install gitbook-plugin-github,
也可以从源码GitHub地址中下载,放到node_modules文件夹里(GitHub地址在进入插件地址右侧的GitHub链接)
{
    "plugins": [
        "github"
    ],
    "pluginsConfig": {
        "github": {
            "url": "https://github.com/zhangjikai"
        }
    }
}
效果图:

3.11. Github Buttons 添加项目在 github 上的 star,watch,fork情况
在book.json中添加以下内容。然后执行gitbook install,
或者使用NPM安装(单独安装推荐NPM)npm install gitbook-plugin-github-buttons,
也可以从源码GitHub地址中下载,放到node_modules文件夹里(GitHub地址在进入插件地址右侧的GitHub链接)
{
    "plugins": [
        "github-buttons"
    ],
    "pluginsConfig": {
        "github-buttons": {
            "repo": "zhangjikai/gitbook-use",
            "types": [
                "star",
                "watch",
                "fork"
            ],
            "size": "small"
        }
    }
}
3.12. emphasize 为文字加上底色
在book.json中添加以下内容。然后执行gitbook install,
或者使用NPM安装(单独安装推荐NPM)npm install gitbook-plugin-emphasize,
也可以从源码GitHub地址中下载,放到node_modules文件夹里(GitHub地址在进入插件地址右侧的GitHub链接)
{
    "plugins": [
        "emphasize"
    ]
}
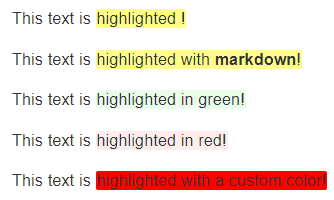
然后在markdown / asciidoc内容中,使用以下内容突出显示一些文本:
This text is {% em %}highlighted !{% endem %}
This text is {% em %}highlighted with **markdown**!{% endem %}
This text is {% em type="green" %}highlighted in green!{% endem %}
This text is {% em type="red" %}highlighted in red!{% endem %}
This text is {% em color="#ff0000" %}highlighted with a custom color!{% endem %}
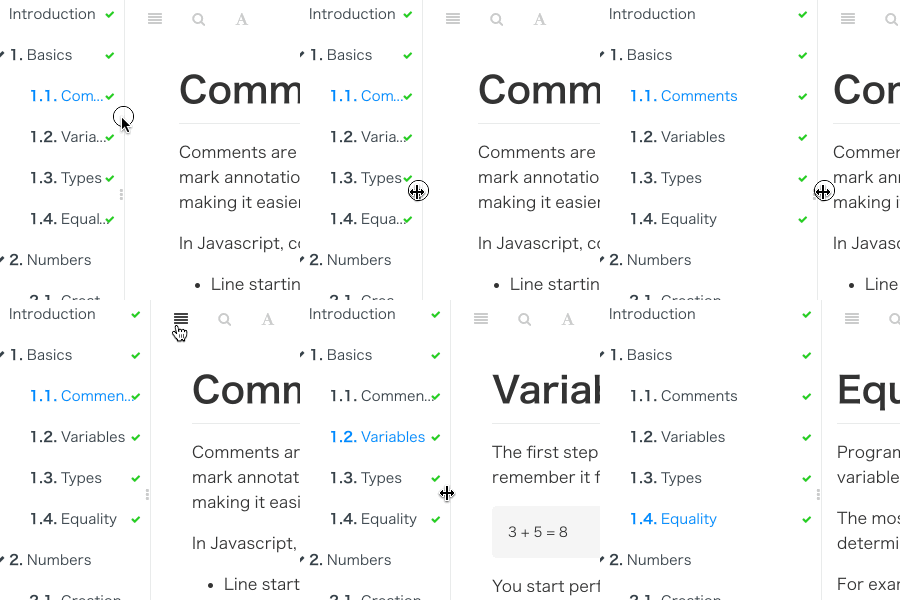
3.13. splitter 侧边栏宽度可调节
在book.json中添加以下内容。然后执行gitbook install,
或者使用NPM安装(单独安装推荐NPM)npm install gitbook-plugin-splitter,
也可以从源码GitHub地址中下载,放到node_modules文件夹里(GitHub地址在进入插件地址右侧的GitHub链接)
{
    "plugins": [
        "splitter"
    ]
}
效果图:
3.14. sharing-plus 分享
在book.json中添加以下内容。然后执行gitbook install,
或者使用NPM安装(单独安装推荐NPM)npm install gitbook-plugin-sharing-plus,
也可以从源码GitHub地址中下载,放到node_modules文件夹里(GitHub地址在进入插件地址右侧的GitHub链接)
{
    "plugins": ["-sharing", "sharing-plus"],
    "pluginsConfig": {
        "sharing": {
           "douban": false,
           "facebook": false,
           "google": true,
           "hatenaBookmark": false,
           "instapaper": false,
           "line": true,
           "linkedin": true,
           "messenger": false,
           "pocket": false,
           "qq": false,
           "qzone": true,
           "stumbleupon": false,
           "twitter": false,
           "viber": false,
           "vk": false,
           "weibo": true,
           "whatsapp": false,
           "all": [
               "douban", "facebook", "google", "hatenaBookmark",
               "instapaper", "linkedin","twitter", "weibo",
               "messenger","qq", "qzone","viber","vk",
               "pocket", "stumbleupon","whatsapp"
           ]
       }
    }
}
其中:
为true的代表直接显示在页面顶端,为false的不显示,不写默认为false
"all"中代表点击分享符号显示出来的
支持网站:
"douban", "facebook", "google", "hatenaBookmark",
"instapaper", "linkedin","twitter", "weibo",
"messenger","qq", "qzone","viber","vk",
"pocket", "stumbleupon","whatsapp"
效果图:

如果想增加其他分享网站,可以自己修改插件文件button.js和package.json。
首先你要知道那个网站的分享链接的结构(可以随便找其他的网站点击分享看看URL), 比如我增加分享到人人网,链接是这样的结构(红框里的是通用结构,后面内容是不同的。 第一部分表示被分享的URL,第二部分是标题title):

然后在button.js中的var SITES = {····}中添加一条信息,和上面其他分享的信息类似。 比如我增加的人人网是这样的

在package.json中仿照前面内容添加新网站的信息。比如我添加的人人网:
{
    "renren": {
        "default": false,
        "description": "人人网",
        "type": "boolean"
    }
}
3.15. 页脚、版权信息
tbfed-pagefooter 页面添加页脚(内容少)
在book.json中添加以下内容。然后执行gitbook install,
或者使用NPM安装(单独安装推荐NPM)npm install gitbook-plugin-tbfed-pagefooter,
也可以从源码GitHub地址中下载,放到node_modules文件夹里(GitHub地址在进入插件地址右侧的GitHub链接)
{
"plugins": [
"tbfed-pagefooter"
],
"pluginsConfig": {
"tbfed-pagefooter": {
"copyright":"Copyright © zhangjikai.com 2017",
"modify_label": "该文件修订时间:",
"modify_format": "YYYY-MM-DD HH:mm:ss"
}
}
}
如果想加入一个URL,自己可以去index.js里,把powered by gitbook,改成
powered by <a href="你的URL" target="_blank">你的名字</a>
page-copyright 页面页脚版权(内容多)
在book.json中添加以下内容。然后执行gitbook install,
或者使用NPM安装(单独安装推荐NPM)npm install gitbook-plugin-page-copyright,
也可以从源码GitHub地址中下载,放到node_modules文件夹里(GitHub地址在进入插件地址右侧的GitHub链接)
{
    "plugins" : ["page-copyright"],
    "pluginsConfig" : {
        "page-copyright": {
          "description": "modified at",
          "signature": "你的签名",
          "wisdom": "Designer, Frontend Developer & overall web enthusiast",
          "format": "YYYY-MM-dd hh:mm:ss",
          "copyright": "Copyright © 你的名字",
          "timeColor": "#666",
          "copyrightColor": "#666",
          "utcOffset": "8",
          "style": "normal",
          "noPowered": false
        }
    }
}
运行以后有很多信息是原创作者的,
这些配置都在你的插件安装目录**\node_modules\gitbook-plugin-page-copyright下的index.js中,
自己可以修改。大部分信息都在defaultOption中。
那个二维码可以在文件中找到QRcode改成自己的,或者直接把所有的efaultOption.isShowQRCode改成false
3.16. sectionx 将页面分块显示
用于将页面分成多个部分,并添加按钮以允许读者控制每个部分的可见性
在book.json中添加以下内容。然后执行gitbook install,
或者使用NPM安装(单独安装推荐NPM)npm install gitbook-plugin-sectionx,
也可以从源码GitHub地址中下载,放到node_modules文件夹里(GitHub地址在进入插件地址右侧的GitHub链接)
{
    "plugins": [
       "sectionx"
    ]
}
使用方法
- 内容分块:
在.md文件中定义一个部分(就是插入下面的字段)。
markdown中示例代码:
<!--sec data-title="标题2" data-id="section0" data-show=true ces-->
内容部分2;
<!--endsec-->
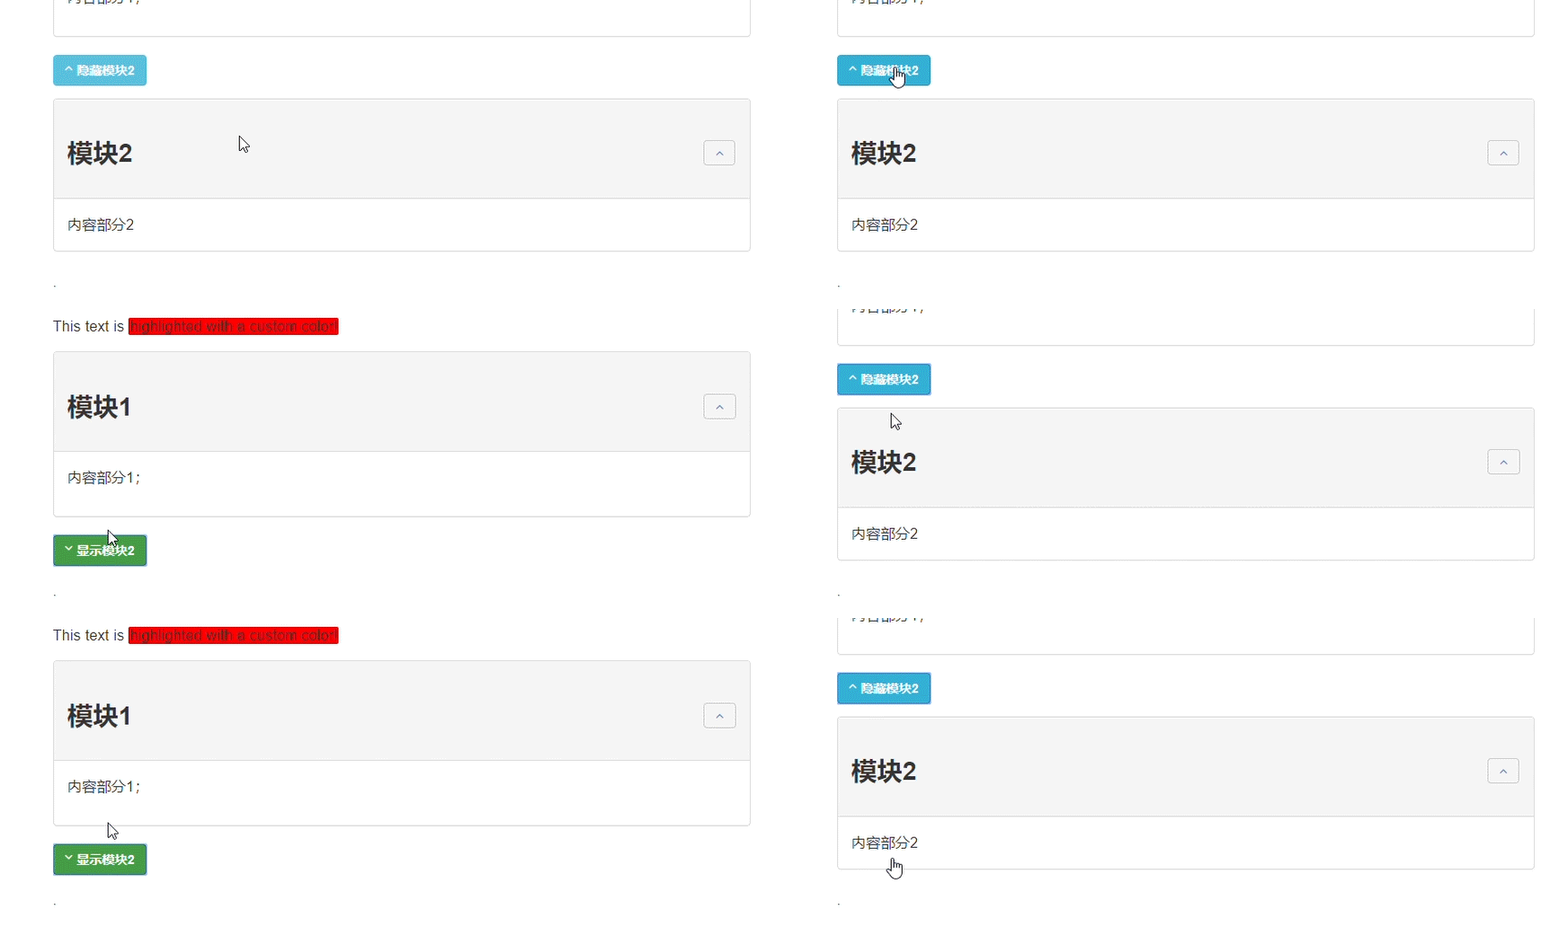
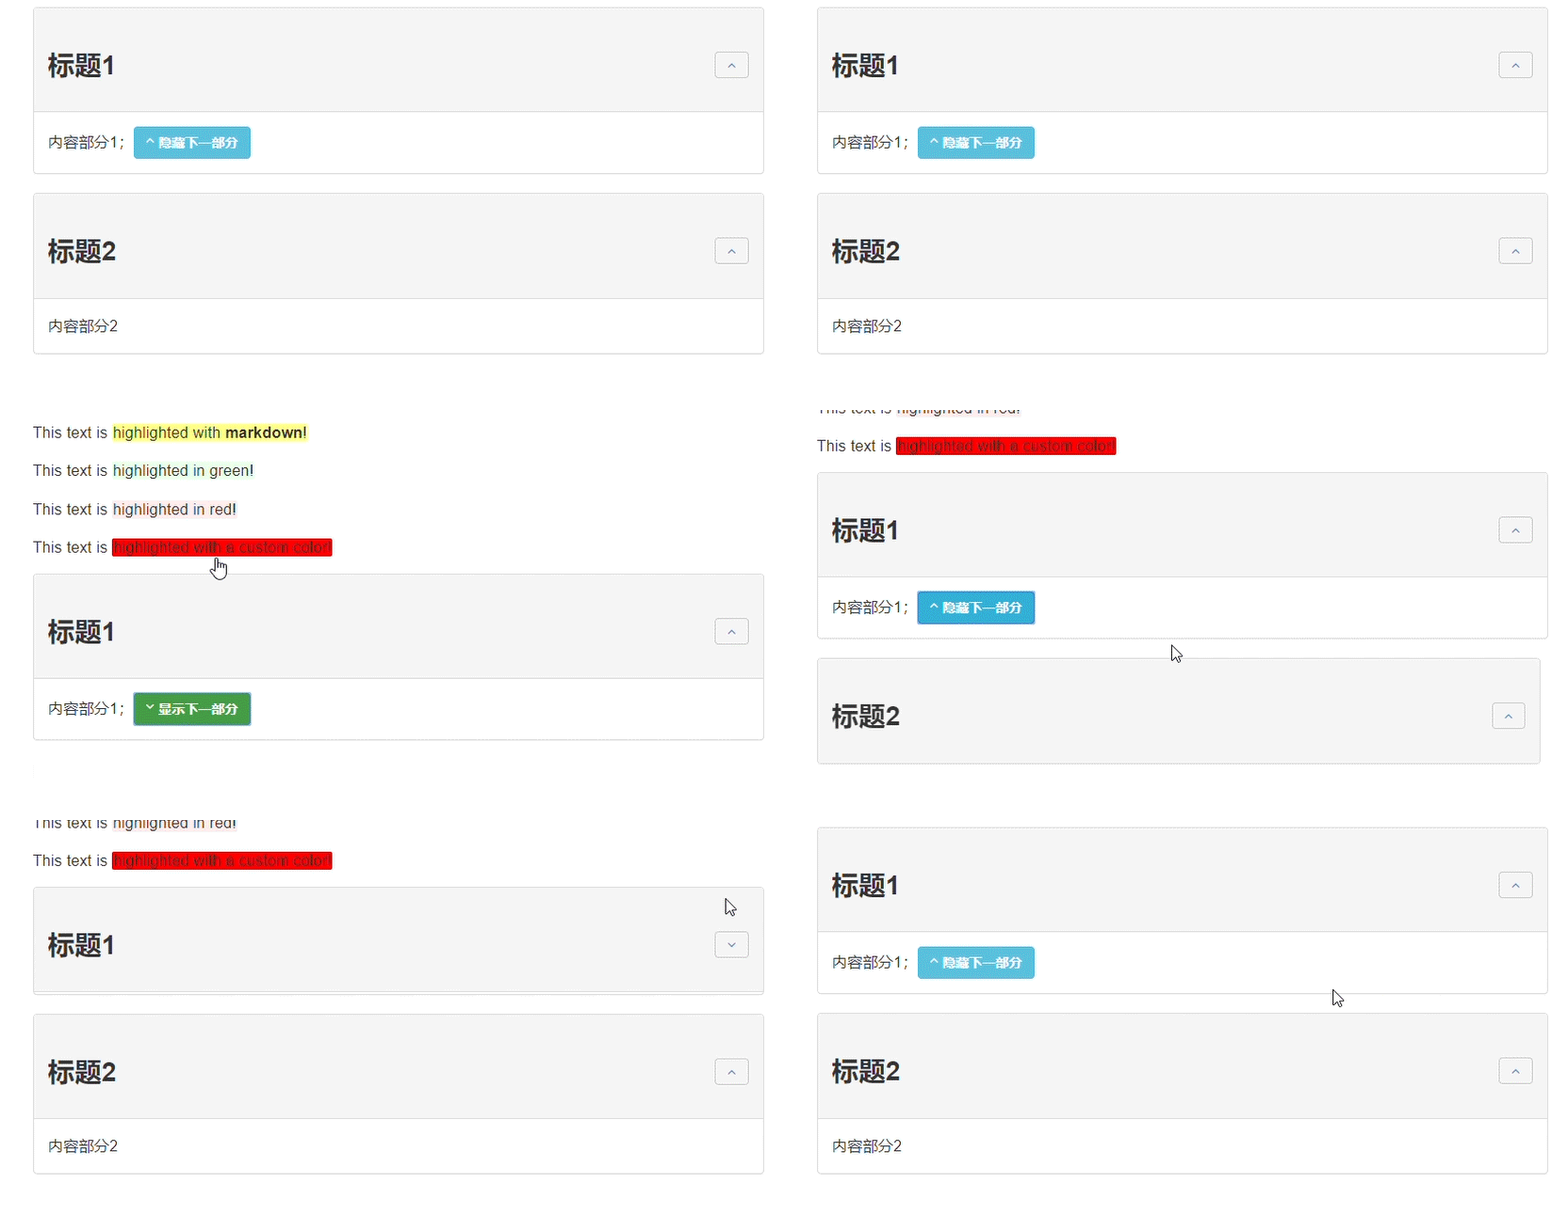
效果图1:

这里只采用三个参数,其他参数如下所示:
| 参数 | 说明 |
|---|---|
| data-title | 该部分的标题,它将显示为bootstrap面板的标题(大小为h2)。 请注意,您不能使用 "标题中的字符,请& quot;改用。 |
| data-id | 章节的id,对按钮控制很有用(在下一节中讨论)。 |
| data-show | 默认表示面板内容是否可见的布尔值。 true:默认情况下,面板内容对用户可见,面板标题可以单击。 false:默认情况下,面板内容对用户隐藏,面板 标题不可点击,只能通过添加自定义按钮查看(在下一节中讨论)。 |
| data-nopd | 一个布尔值,表示该部分是否将隐藏在pdf导出中。 true:面板不会显示在.pdf或.epub中。 |
| data-collapse | 一个布尔值,表示默认情况下是否打开(但仍然可见)该部分。 true:默认情况下,面板内容对用户可见,但已关闭。 false:默认情况下,面板内容对用户可见,但已打开(默认设置)。 |
- 添加按钮,控制部分可见性
通过在GitBook中添加内联HTML,以下代码可以添加一个按钮,以允许您查看或隐藏其他部分。
简单来说,就是在【使用1】的内容部分添加一个按钮:
<button class="section" target="section1" show="显示下一部分" hide="隐藏下一部分"></button>
标签说明:
| 参数 | 说明 |
|---|---|
| class | 该按钮必须属于类“section”。//这里就是用到 1部分的section |
| target | 当按下时,将切换id为target的部分。 |
| show | 隐藏目标部分时按钮上的文本。 |
| hide | 目标部分可见时按钮上的文本。 |
效果图2:
- 混合使用
将第2节的button块添加到第1节的内容部分
markdown中示例代码:
<!--sec data-title="标题1" data-id="section0" data-show=true ces-->
内容部分1;
<button class="section" target="section1" show="显示下一部分" hide="隐藏下一部分"></button>
<!--endsec-->
<!--sec data-title="标题2" data-id="section1" data-show=true ces-->
内容部分2
<!--endsec-->
效果图3:
3.17. 生成页内目录
page-treeview 生成页内目录
在book.json中添加以下内容。然后执行gitbook install,
或者使用NPM安装(单独安装推荐NPM)npm install gitbook-plugin-page-treeview,
也可以从源码GitHub地址中下载,放到node_modules文件夹里(GitHub地址在进入插件地址右侧的GitHub链接)
{
    "plugins": ["page-treeview"]
}
非必要的配置项:
{
    "plugins": [
        "page-treeview"
    ],
    "pluginsConfig": {
        "page-treeview": {
            "copyright": "Copyright © aleen42",
            "minHeaderCount": "2",
            "minHeaderDeep": "2"
        }
    }
}
偷偷地告诉你,这个插件生成目录以后,下面有一行关于版权的文字。如果想去掉的话,
找到插件目录下的index.js文件:***/node_modules/gitbook-plugin-page-treeview/lib/index.js
找到大约111行,删除这一行关于var copyRight的定义
下面113行的var insertTreeview中,删除+ copyRight,目前就不显示了
142行中的'copyright': 'Copyright & #169; aleen42',也可以删除
下面161行和163行和111行113行一样的,其实不删除也不显示了。
但是以后执行gitbook install就恢复了。
simple-page-toc 生成本页目录
需要插入标签,支持1-3级标签
页面顶端生成。另外 GitBook 在处理重复的标题时有些问题,所以尽量不使用重复的标题。
在book.json中添加以下内容。然后执行gitbook install,
或者使用NPM安装(单独安装推荐NPM)npm install gitbook-plugin-simple-page-toc,
也可以从源码GitHub地址中下载,放到node_modules文件夹里(GitHub地址在进入插件地址右侧的GitHub链接)
{
    "plugins" : [
        "simple-page-toc"
    ],
    "pluginsConfig": {
        "simple-page-toc": {
            "maxDepth": 3,
            "skipFirstH1": true
        }
    }
}
| 参数 | 说明 |
|---|---|
| "maxDepth": 3 | 使用深度最多为maxdepth的标题。 |
| "skipFirstH1": true | 排除文件中的第一个h1级标题。 |
使用方法: <! -- toc -->在文本中的某处放置代码注释会将此注释后面的内容生成目录,并插入在标签后方,全文都生成的话就在文首添加。
Ps: 此目录锚点仅支持英文标题,中文标题无法实现跳转。中文文档不推荐使用。
3.18. 悬浮目录
page-toc-button 悬浮目录
在book.json中添加以下内容。然后执行gitbook install,
或者使用NPM安装(单独安装推荐NPM)npm install gitbook-plugin-page-toc-button,
也可以从源码GitHub地址中下载,放到node_modules文件夹里(GitHub地址在进入插件地址右侧的GitHub链接)
{
    "plugins" : [ "page-toc-button" ]
}
可选配置
{
    "plugins" : [
        "page-toc-button"
    ],
    "pluginsConfig": {
        "page-toc-button": {
            "maxTocDepth": 2,
            "minTocSize": 2
           }
    }
}
ancre-navigation 悬浮目录和回到顶部
添加Toc到侧边悬浮导航以及回到顶部按钮。
自动在标题前生成列表项:"1. " "1.1. " "2. " "2.2. "
需要注意以下两点:
- 本插件只会提取
h[1-3]标签作为悬浮导航 - 只有按照以下顺序嵌套才会被提取
# h1
## h2
### h3
必须要以 h1 开始,直接写 h2 不会被提取
## h2
在book.json中添加以下内容。然后执行gitbook install,
或者使用NPM安装(单独安装推荐NPM)npm install gitbook-plugin-ancre-navigation,
也可以从源码GitHub地址中下载,放到node_modules文件夹里(GitHub地址在进入插件地址右侧的GitHub链接)
{
    "plugins": [
        "ancre-navigation"
    ]
}
anchor-navigation-ex 添加Toc到侧边悬浮导航以及回到顶部按钮
需要注意以下两点:
- 本插件只会提取
h[1-3]标签作为悬浮导航 - 只有按照以下顺序嵌套才会被提取
# h1
## h2
### h3
必须要以 h1 开始,直接写 h2 不会被提取
## h2
在book.json中添加以下内容。然后执行gitbook install,
或者使用NPM安装(单独安装推荐NPM)npm install gitbook-plugin-anchor-navigation-ex,
也可以从源码GitHub地址中下载,放到node_modules文件夹里(GitHub地址在进入插件地址右侧的GitHub链接)
{
    "plugins": [
            "anchor-navigation-ex"
        ],
        "pluginsConfig": {
            "anchor-navigation-ex": {
                "showLevel": true,
                    "associatedWithSummary": true,
                    "printLog": false,
                    "multipleH1": true,
                    "mode": "float",
                    "showGoTop":true,
                    "float": {
                        "floatIcon": "fa fa-navicon", // 配置导航图标,如果你喜欢原先的 锚 图标可以配置为 fa-anchor
                        "showLevelIcon": false,  // 是否显示层级图标
                        "level1Icon": "fa fa-hand-o-right", // 层级的图标css
                        "level2Icon": "fa fa-hand-o-right",
                        "level3Icon": "fa fa-hand-o-right"
                    },
                    "pageTop": {
                        "showLevelIcon": false,
                        "level1Icon": "fa fa-hand-o-right",
                        "level2Icon": "fa fa-hand-o-right",
                        "level3Icon": "fa fa-hand-o-right"
                    }
            }
        }
}
图标使用官网默认主题引入的css http://fontawesome.dashgame.com/
其中multipleH1配置选项,如果为true的话,将按照一个md文件有多个H1标题处理, 为false的话,则按照一个md文件只包含一个h1标题处理,最大的区别就是去掉了丑陋的1.xxx 中的1.
生成页面内目录:在页面中增加<extoc></extoc>标签,会在此处生成TOC目录
效果如下:
3.19. klipse 嵌入类似IDE的功能
嵌入一块功能,可在代码段中实时交互,即(输入代码 > 执行结果
在book.json中添加以下内容。然后执行gitbook install,
或者使用NPM安装(单独安装推荐NPM)npm install gitbook-plugin-klipse,
也可以从源码GitHub地址中下载,放到node_modules文件夹里(GitHub地址在进入插件地址右侧的GitHub链接)
{
    "plugins": ["klipse"]
}
klipse 目前支持下面的语言:
- javascript: evaluation is done with the javascript function eval and pretty printing of the result is done with pretty-format
- clojure
[script]: evaluation is done with Self-Hosted Clojurescript - ruby: evaluation is done with Opal
- C++: evaluation is done with JSCPP
- python: evaluation is done with Skulpt
- scheme: evaluation is done with BiwasScheme
- PHP: evaluation is done with Uniter
- BrainFuck
- JSX
- EcmaScript2017
- Google Charts: See Interactive Business Report with Google Charts.
下面是一个python的使用示例,其他语言类似,比如(eval-js):(.需替换`)
...eval-python
    print [x +1 for x in range(10)]
...
效果如下所示:

3.20. donate 打赏插件
文章最下面的按钮,点击可弹出图片
在book.json中添加以下内容。然后执行gitbook install,
或者使用NPM安装(单独安装推荐NPM)npm install gitbook-plugin-donate,
也可以从源码GitHub地址中下载,放到node_modules文件夹里(GitHub地址在进入插件地址右侧的GitHub链接)
{
    "plugins": [
        "donate"
    ],
    "pluginsConfig": {
        "donate": {
            "wechat": "微信收款的二维码URL",
            "alipay": "支付宝收款的二维码URL",
            "title": "",
            "button": "赏",
            "alipayText": "支付宝打赏",
            "wechatText": "微信打赏"
        }
    }
}
3.21. change_girls 可自动切换的背景
添加背景图片,并且可以自动切换
在book.json中添加以下内容。然后执行gitbook install,
或者使用NPM安装(单独安装推荐NPM)npm install gitbook-plugin-change_girls,
也可以从源码GitHub地址中下载,放到node_modules文件夹里(GitHub地址在进入插件地址右侧的GitHub链接)
{
    "plugins":["change_girls"],
    "pluginsConfig": {
        "change_girls" : {
            "time" : 10,
            "urls" : [
                "girlUrl1", "girlUrl2", "...更多Url"
            ]
        }
    }
}
字段说明:
- time:图片的切换时间,单位是秒
- urls: 一个数组,可以定义多个图片,只能使用互联网上的绝对地址
3.22. Include-csv 展示 csv 文件
添加背景图片,并且可以自动切换
在book.json中添加以下内容。然后执行gitbook install,
或者使用NPM安装(单独安装推荐NPM)npm install gitbook-plugin-change_girls,
也可以从源码GitHub地址中下载,放到node_modules文件夹里(GitHub地址在进入插件地址右侧的GitHub链接)
{
    "plugins": ["include-csv"]
}
使用示例:
{% includeCsv src="../assets/csv/test.csv", useHeader="true" %} {% endincludeCsv %}
效果如下所示:
| 产业 | 数值 | 比重 |
|---|---|---|
| 第一产业 | 111 | 10.00% |
| 第二产业 | 222 | 20.00% |
| 第三产业 | 333 | 30.00% |
| 第四产业 | 444 | 40.00% |
3.23. 警报
这两个警报插件类似,其中的图标文件有些可以共用
alerts 警报
这个GitBook插件将块引用转换为漂亮的警报。
在book.json中添加以下内容。然后执行gitbook install,
或者使用NPM安装(单独安装推荐NPM)npm install gitbook-plugin-alerts,
也可以从源码GitHub地址中下载,放到node_modules文件夹里(GitHub地址在进入插件地址右侧的GitHub链接)
{
    "plugins": ["alerts"]
}
用法样式:
信息样式
> **[info] For info**
>
> Use this for infomation messages.
警告样式
> **[warning] For warning**
>
> Use this for warning messages.
危险样式
> **[danger] For danger**
>
> Use this for danger messages.
成功样式
> **[success] For success**
>
> Use this for success messages.
flexible-alerts 警报
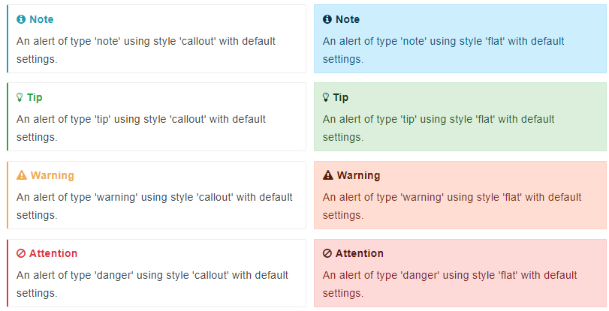
这个GitBook插件将块引用转换为漂亮的警报。可以在全局和警报特定级别配置外观, 因此输出确实符合您的需求(如下图)。此外,您还可以提供自己的警报类型(比如最后的comment)。
这个看上面那个链接里的内容更丰富一点
用法:
1) 在你的gitbook的book.json文件中,添加flexible-alerts到插件列表。
2) 在pluginsConfig中,配置插件以满足您的需求。自定义设置不是必需的。
简单使用
在book.json中添加以下内容。然后执行gitbook install,
或者使用NPM安装(单独安装推荐NPM)npm install gitbook-plugin-flexible-alerts,
也可以从源码GitHub地址中下载,放到node_modules文件夹里(GitHub地址在进入插件地址右侧的GitHub链接)
{
  "plugins": [
    "flexible-alerts"
  ]
}
2.markdown文件中编辑
简单的markdown文件写法,效果见上图的第一个图:
> [!NOTE]
> 这是一个简单的Note类型的使用,所有的属性都是默认值。
上面的[!NOTE]是行匹配模式,默认情况下支持类型NOTE,TIP,WARNING和DANGER。
可以通过提供有效配置来扩展可用类型(请参阅这一节最下面的示例COMMENT)
个性化使用:
在markdown中的个性化语法
> [!type|style:xx|label:xx|icon:xx|className:xx|labelVisibility:xx|iconVisibility:xx]
> 内容部分
字段介绍,如果不设置的表示选择默认,除了!type都不是必需
| 参数 | 允许的值 | 说明 |
|---|---|---|
| !type | NOTE,TIP,WARNING和DANGER |
警告级别设置 |
| style | 以下值之一: callout(默认), flat |
警告样式,见图19的左右不同 |
| label | 任何文字 | 警告块的标题位置,即Note这个字段位置(不支持中文) |
| icon | 比如: fa fa-info-circle |
一个有效的Font Awesome图标,那块小符号 |
| className | CSS类的名称 | 指定css文件,用于指定外观 |
| labelVisibility | 以下值之一:visible(默认),hidden |
标签是否可见 |
| iconVisibility | 以下值之一:visible(默认),hidden |
图标是否可见 |
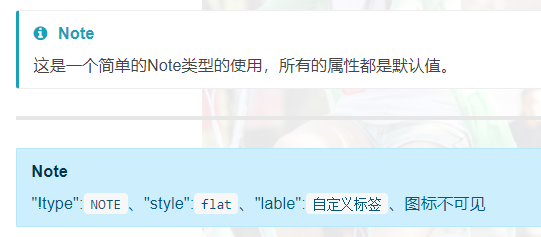
对比:
> [!NOTE]
> 这是一个简单的Note类型的使用,所有的属性都是默认值。
---
> [!NOTE|style:flat|lable:Mylable|iconVisibility:hidden]
> "!type":`NOTE`、"style":`flat`、"lable":`自定义标签`、图标不可见
效果:
json配置个性化 自定义一个COMMENT类型 在book.json中添加以下内容。然后执行gitbook install, 或者使用NPM安装(单独安装推荐NPM)npm install gitbook-plugin-flexible-alerts, 也可以从源码GitHub地址中下载,放到node_modules文件夹里(GitHub地址在进入插件地址右侧的GitHub链接):
{
  "plugins": [
    "flexible-alerts"
  ],
  "pluginsConfig": {
    "flexible-alerts": {
      "style": "callout",
      "comment": {
        "label": "Comment",
        "icon": "fa fa-comments",
        "className": "info"
      }
    }
  }
}
示例:
> [!COMMENT]
> An alert of type 'comment' using style 'callout' with default settings.
效果:

3.24. pageview-count 阅读量计数
在book.json中添加以下内容。然后执行gitbook install,
或者使用NPM安装(单独安装推荐NPM)npm install gitbook-plugin-pageview-count,
也可以从源码GitHub地址中下载,放到node_modules文件夹里(GitHub地址在进入插件地址右侧的GitHub链接)
{
    "plugins": [
        "pageview-count"
    ]
}
3.25. auto-scroll-table 表格滚动条
为避免表格过宽,增加滚动条
在book.json中添加以下内容。然后执行gitbook install,
或者使用NPM安装(单独安装推荐NPM)npm install gitbook-plugin-auto-scroll-table,
也可以从源码GitHub地址中下载,放到node_modules文件夹里(GitHub地址在进入插件地址右侧的GitHub链接)
{
 "plugins": ["auto-scroll-table"]
}
没滚动条刷新一下页面
3.26. KaTex
为了支持数学公式, 我们可以使用KaTex和MathJax插件, 官网上说Katex速度要快于MathJax
在book.json中添加以下内容。然后执行gitbook install,
或者使用NPM安装(单独安装推荐NPM)npm install gitbook-plugin-katex,
也可以从源码GitHub地址中下载,放到node_modules文件夹里(GitHub地址在进入插件地址右侧的GitHub链接)
{
  "plugins" : [ "katex" ]
}
使用示例:
您现在可以使用{% math %}块将TeX公式添加到您的书中

When {% math %}a \ne 0{% endmath %}, there are two solutions to {% math %}(ax^2 + bx + c = 0){% endmath %} and they are {% math %}x = {-b \pm \sqrt{b^2-4ac} \over 2a}.{% endmath %}

您还可以使用快捷方式`$ $`:

When {% math %}a \ne 0{% endmath %}, there are two solutions to {% math %}(ax^2 + bx + c = 0){% endmath %} and they are {% math %}x = {-b \pm \sqrt{b^2-4ac} \over 2a}.{% endmath %}
When , there are two solutions to and they are
When , there are two solutions to and they are
3.27. Anchors 添加 Github 风格的锚点样式

在book.json中添加以下内容。然后执行gitbook install,
或者使用NPM安装(单独安装推荐NPM)npm install gitbook-plugin-anchors,
也可以从源码GitHub地址中下载,放到node_modules文件夹里(GitHub地址在进入插件地址右侧的GitHub链接)
{
  "plugins" : [ "anchors" ]
}
3.28. Ace Plugin
使 GitBook 支持ace 。默认情况下,line-height 为 1,会使代码显得比较挤,而作者好像没提供修改行高的选项,如果需要修改行高, 可以到 node_modules -> github-plugin-ace -> assets -> ace.js 中加入下面两行代码 (30 行左右的位置):
editor.container.style.lineHeight = 1.25;
editor.renderer.updateFontSize();
不过上面的做法有个问题就是,每次使用 gitbook install 安装新的插件之后,代码又会重置为原来的样子。 另外可以在 website.css 中加入下面的 css 代码来指定 ace 字体的大小
.aceCode {
  font-size: 14px !important;
}
使用插件:
在book.json中添加以下内容。然后执行gitbook install,
或者使用NPM安装(单独安装推荐NPM)npm install gitbook-plugin-ace,
也可以从源码GitHub地址中下载,放到node_modules文件夹里(GitHub地址在进入插件地址右侧的GitHub链接)
{
  "plugins": [
      "ace"
  ]
}
3.29. Include Codeblock
使用代码块的格式显示所包含文件的内容. 该文件必须存在。插件提供了一些配置,可以区插件官网查看。 如果同时使用 ace 和本插件,本插件要在 ace 插件前面加载。
在book.json中添加以下内容。然后执行gitbook install,
或者使用NPM安装(单独安装推荐NPM)npm install gitbook-plugin-include-codeblockk,
也可以从源码GitHub地址中下载,放到node_modules文件夹里(GitHub地址在进入插件地址右侧的GitHub链接)
{
  "plugins": [
      "include-codeblock"
  ],
  "pluginsConfig": {
      "include-codeblock": {
          "template": "ace",
          "unindent": "true",
          "theme": "monokai"
      }
  }
}
使用示例:
{% if file.type=="asciidoc" %}++++{% endif %}
<div class="ace"><div class="aceCode" data-config={"edit":true,"lang":"css","check":false,"theme":"chrome"}>{%raw%}/* CSS for website */
h1 , h2{
border-bottom: 1px solid #EFEAEA;
padding-bottom: 3px;
}
.markdown-section>:first-child {
margin-top: 0!important;
}
.page-wrapper {
margin-top: -1.275em;
}
.book .book-body .page-wrapper .page-inner section.normal {
min-height:350px;
margin-bottom: 30px;
}
.book .book-body .page-wrapper .page-inner section.normal hr {
height: 0px;
padding: 0;
margin: 1.7em 0;
overflow: hidden;
background-color: #e7e7e7;
border-bottom: 1px dotted #e7e7e7;
}
.video-js {
width:100%;
height: 100%;
}
pre[class*="language-"] {
border: none;
background-color: #f7f7f7;
font-size: 1em;
line-height: 1.2em;
}
.book .book-body .page-wrapper .page-inner section.normal {
font-size: 16px;
font-family: "ubuntu", "Tahoma", "Microsoft YaHei", arial, sans-serif;
}
.aceCode {
font-size: 14px !important;
}
input[type=checkbox]{
margin-left: -2em;
}
.page-footer span{
font-size: 12px;
}
.page-footer .copyright {
float: left;
}
.body, html {
overflow-y: hidden;
}
.versions-select select {
height: 2em;
line-height: 2em;
border-radius: 4px;
background: #efefef;
}{%endraw%}<br></div></div>
{% if file.type=="asciidoc" %}++++{% endif %}
3.30. 查看图片
popup 弹出大图
单击图片,在新页面查看大图。
在book.json中添加以下内容。然后执行gitbook install,
或者使用NPM安装(单独安装推荐NPM)npm install gitbook-plugin-popup,
也可以从源码GitHub地址中下载,放到node_modules文件夹里(GitHub地址在进入插件地址右侧的GitHub链接)
{
  "plugins": [ "popup" ]
}
lightbox 单击查看图片
新窗口打开图片,大小不变
在book.json中添加以下内容。然后执行gitbook install,
或者使用NPM安装(单独安装推荐NPM)npm install gitbook-plugin-lightbox,
也可以从源码GitHub地址中下载,放到node_modules文件夹里(GitHub地址在进入插件地址右侧的GitHub链接)
{
  "plugins": ["lightbox"]
}
3.31. click-reveal 点击显示
默认隐藏,点击可显示。
在book.json中添加以下内容。然后执行gitbook install,
或者使用NPM安装(单独安装推荐NPM)npm install gitbook-plugin-click-reveal,
也可以从源码GitHub地址中下载,放到node_modules文件夹里(GitHub地址在进入插件地址右侧的GitHub链接)
{
    "plugins": [
        "click-reveal"
    ]
}
快速使用:
默认显示的文字是Click to show:
{% reveal %}
要被隐藏的内容
{% endreveal %}
使用自定义显示文字:
{% reveal text="点击显示" %}
要被隐藏的内容
{% endreveal %}
用HTML语法也可以:
<div class="click_reveal"><span> 点击显示 </span><div><pre><code>隐藏的文字</code></pre></div></div>
3.32. Favicon 更改网站的 favicon.ico
在book.json中添加以下内容。然后执行gitbook install,
或者使用NPM安装(单独安装推荐NPM)npm install gitbook-plugin-favicon,
也可以从源码GitHub地址中下载,放到node_modules文件夹里(GitHub地址在进入插件地址右侧的GitHub链接)
{
    "plugins": [
        "favicon"
    ],
    "pluginsConfig": {
        "favicon": {
            "shortcut": "assets/images/favicon.ico",
            "bookmark": "assets/images/favicon.ico",
            "appleTouch": "assets/images/apple-touch-icon.png",
            "appleTouchMore": {
                "120x120": "assets/images/apple-touch-icon-120x120.png",
                "180x180": "assets/images/apple-touch-icon-180x180.png"
            }
        }
    }
}
3.33. custom-favicon 修改标题栏图标
在book.json中添加以下内容。然后执行gitbook install,
或者使用NPM安装(单独安装推荐NPM)npm install gitbook-plugin-custom-favicon,
也可以从源码GitHub地址中下载,放到node_modules文件夹里(GitHub地址在进入插件地址右侧的GitHub链接)
{
    "plugins" : ["custom-favicon"],
    "pluginsConfig" : {
        "favicon": "path/to/favicon.ico"
    }
}
把.ico格式的图标放进项目中。这个路径可以使用相对路径,比如我用的是./images/a.ico
注意:这个pluginsConfig和其他的不大一样。图标只能用.ico文件。
3.34. embed-pdf 在GitBook中嵌入内联PDF
在book.json中添加以下内容。然后执行 gitbook install,
或者使用NPM安装(单独安装推荐NPM)npm install gitbook-plugin-embed-pdf,
也可以从源码GitHub地址中下载,放到 node_modules 文件夹里(GitHub地址在进入插件地址右侧的GitHub链接)
{
    "plugins" : ["embed-pdf"]
}
3.35. accordion 折叠模块
在book.json中添加以下内容。然后执行gitbook install,
或者使用NPM安装(单独安装推荐NPM)npm install gitbook-plugin-accordion,
也可以从源码GitHub地址中下载,放到node_modules文件夹里(GitHub地址在进入插件地址右侧的GitHub链接)
{
  "plugins": ["accordion"]
}
用法:
编辑内容,用下面的标签括起来。
%accordion%模块标题%accordion%
内容部分
%/accordion%
3.36. hide-element 隐藏元素
在book.json中添加以下内容。然后执行gitbook install,
或者使用NPM安装(单独安装推荐NPM)npm install gitbook-plugin-hide-element,
也可以从源码GitHub地址中下载,放到node_modules文件夹里(GitHub地址在进入插件地址右侧的GitHub链接)
{
    "plugins": [
        "hide-element"
    ],
    "pluginsConfig": {
        "hide-element": {
            "elements": [".gitbook-link"]
        }
    }
}
3.37. Chart 使用 C3.js 或者 Highcharts 绘制图形。
在book.json中添加以下内容。然后执行gitbook install,
或者使用NPM安装(单独安装推荐NPM)npm install gitbook-plugin-chart,
也可以从源码GitHub地址中下载,放到node_modules文件夹里(GitHub地址在进入插件地址右侧的GitHub链接)
{
    "plugins": [ "chart" ],
    "pluginsConfig": {
        "chart": {
            "type": "c3"
        }
    }
}
type 可以是 c3 或者 highcharts, 默认是 c3.
下面是一个c3示例:
{% chart %}
{
    "data": {
        "type": "bar",
        "columns": [
            ["data1", 30, 200, 100, 400, 150, 250],
            ["data2", 50, 20, 10, 40, 15, 25]
        ],
        "axes": {
            "data2": "y2"
        }
    },
    "axis": {
        "y2": {
            "show": true
        }
    }
}
{% endchart %}
效果如下所示:
3.38. Disqus 添加disqus评论
在book.json中添加以下内容。然后执行gitbook install,
或者使用NPM安装(单独安装推荐NPM)npm install gitbook-plugin-disqus,
也可以从源码GitHub地址中下载,放到node_modules文件夹里(GitHub地址在进入插件地址右侧的GitHub链接)
{
    "plugins": [
        "disqus"
    ],
    "pluginsConfig": {
        "disqus": {
            "shortName": "gitbookuse"
        }
    }
}
3.39. Puml 使用 PlantUML 展示 uml 图。
在book.json中添加以下内容。然后执行gitbook install,
或者使用NPM安装(单独安装推荐NPM)npm install gitbook-plugin-puml,
也可以从源码GitHub地址中下载,放到node_modules文件夹里(GitHub地址在进入插件地址右侧的GitHub链接)
{
    "plugins": [
        "puml"
    ]
}
使用示例:
{% plantuml %}
Class Stage
    Class Timeout {
        +constructor:function(cfg)
        +timeout:function(ctx)
        +overdue:function(ctx)
        +stage: Stage
    }
    Stage <|-- Timeout
{% endplantuml %}
效果如下所示:
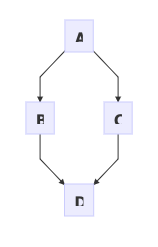
3.40. Mermaid-gb3 支持渲染Mermaid图表
在book.json中添加以下内容。然后执行gitbook install,
或者使用NPM安装(单独安装推荐NPM)npm install gitbook-plugin-mermaid-gb3,
也可以从源码GitHub地址中下载,放到node_modules文件夹里(GitHub地址在进入插件地址右侧的GitHub链接)
{
    "plugins": [
        "mermaid-gb3"
    ]
}
使用示例:
3.41. 其他:设置导航序号
配置,可以在book.json的pluginsConfig中添加如下:
{
    "pluginsConfig": {
        "theme-default": {
        "showLevel": true
        }
    }
}
4. 配置示例
{
    "title": "G笔记",
    "description": "好记性不如G笔记",
    "author": "lijiam",
    "output.name": "site",
    "language": "zh-hans",
    "gitbook": "3.2.3",
    "root": ".",
    "links": {
        "sidebar": {
            "首页": "http://www.lijiam.com"
        }
    },
    "plugins": [
        "code",
        "-search",
        "search-pro",
        "github",
        "splitter",
        "tbfed-pagefooter",
        "donate",
        "-sharing",
        "sharing-plus",
        "prism",
        "-highlight",
        "styles-less",
        "toggle-chapters",
        "multipart",
        "ancre-navigation"
    ],
    "pluginsConfig": {
        "github": {
            "url": "https://github.com/lijiam"
        },
        "code": {
            "copyButtons": true
        },
        "tbfed-pagefooter": {
            "copyright": "Copyright © lijiam 2019",
            "modify_label": "本书发布时间:",
            "modify_format": "YYYY-MM-DD HH:mm:ss"
        },
        "donate": {
            "wechat": "/assets/images/wxpay.png",
            "alipay": "/assets/images/alipay.png",
            "title": "",
            "button": "赏",
            "alipayText": "支付宝打赏",
            "wechatText": "微信打赏"
        },
        "sharing": {
            "facebook": true,
            "twitter": true,
            "weibo": true,
            "qq": true,
            "all": [
                "douban",
                "google",
                "qzone",
                "linkedin"
            ]
        },
        "prism": {
            "css": [
                "prismjs/themes/prism-solarizedlight.css"
            ],
            "lang": {
                "flow": "typescript"
            }
        }
    },
    "styles": {
        "website": "assets/styles/website.less",
        "ebook": "assets/styles/ebook.less",
        "pdf": "assets/styles/pdf.less",
        "mobi": "assets/styles/mobi.less",
        "epub": "assets/styles/epub.less"
    }
}