vue-router使用
作者:高天阳
邮箱:[email protected]
更改历史

* 2018-10-29        高天阳     初始化文档
1 介绍
路由:控制组件之间的跳转,不会实现请求、不用页面刷新,直接跳转-切换组件
2 安装
本地环境安装路由插件vue-router:
cnpm install vue-router --save-dev
- 没有安装淘宝镜像的可以将
cnpm替换成npm
想要安装的可以看这篇文章,(打开搜索镜像即可跳转到对应位置)
3 配置
两种配置方法:在main.js中 || 在src/router文件夹下的index.js中
这里只说在src/router/index.js中的
- 引入
import Vue from 'vue'
import Router from 'vue-router'
注意这个Router是自定义的名字,这里叫这个名字后,下边都要用到的
- 使用/注册:
Vue.use(Router)
- 配置
配置路由
export default new Router({
  routes: [
   {
        path : ‘/’,  //到时候地址栏会显示的路径
        name : ‘Home’,
        component :  Home   // Home是组件的名字,这个路由对应跳转到的组件。。注意component没有加“s”.
    },
    {
        path : ‘/content’,
        name : ‘Content’,
        component :  Content
    }
],
    mode: "history"
})
- 引入路由对应的组件地址
import Home from '@/components/Home'
import Home from '@/components/Content’
- 在main.js中调用index.js的配置
import router from './router'
- App.vue页面使用(展示)路由:
把这个标签放到对应位置
<router-view></router-view>
- 路由切换(原来的等地方):把切换标签和链接改成
<router-link  to="/">切换到Home组件</router-link>
<router-link  to="/content">切换到Content组件</router-link>
这里,to里边的参数和配置时,path的路径一样即可
4 示例
/src/main.js
import Vue from 'vue'
import App from './App'
import router from 'vue-router'

/* eslint-disable no-new */
new Vue({
  router,
  render: h => h(App)
}).$mount('#app-box')
/src/router/index.js
import Vue from 'vue'
import Router from 'vue-router'
import Container from '../components/container/Container'
import Start from '../components/start/Start'
import Gesture from '../components/start/gesture/Gesture'
import Registered from '../components/start/registered/Registered'
import RegisteredDetail from '../components/start/registered/RegisteredDetail'
import Lending from '../components/lending/Lending'
import FinanceDetail from '../components/lending/financeDetail/FinanceDetail'

Vue.use(Router)

export default new Router({
  routes: [
    {
      path: '/',
      redirect: '/start'
    },
    {
      path: '/start',
      component: Container,
      children: [
        {
          path: '/',
          component: Start
        },
        {
          path: 'gesture',
          component: Gesture
        },
        {
          path: 'registered',
          component: Container,
          children: [
            {
              path: '/',
              component: Registered
            },
            {
              path: 'registeredDetail',
              component: RegisteredDetail
            }
          ]
        }
      ]
    },
    {
      path: '/lending',
      component: Container,
      children: [
        {
          path: '/',
          component: Lending
        },
        {
          path: 'financeDetail',
          name: 'financeDetail',
          component: FinanceDetail
        }
      ]
    },
  ]
})
5 最佳实践
5.1 Vue Router 的params和query传参的使用和区别
首先简单来说明一下$router和$route的区别
//$router : 是路由操作对象,只写对象
//$route : 路由信息对象,只读对象

//操作 路由跳转
this.$router.push({
      name:'hello',
      params:{
          name:'word',
          age:'11'
     }
})

//读取 路由参数接收
this.name = this.$route.params.name
this.age = this.$route.params.age
5.1.1 query传递参数
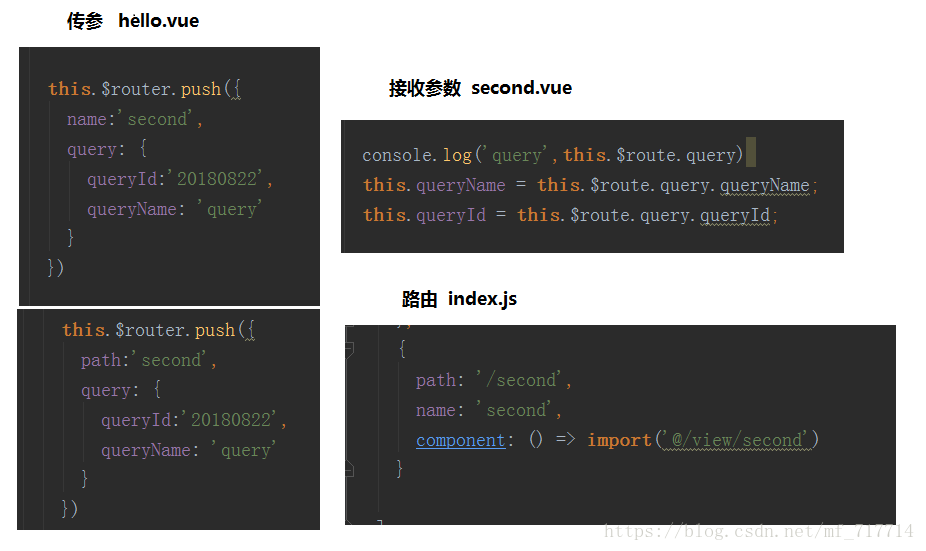
我看了很多人都说query传参要用path来引入,params传参要用name来引入,只是我测试了一下,query使用name来引入也可以传参,使用path也可以。
//query传参,使用name跳转
this.$router.push({
    name:'second',
    query: {
        queryId:'20180822',
        queryName: 'query'
    }
})

//query传参,使用path跳转
this.$router.push({
    path:'second',
    query: {
        queryId:'20180822',
        queryName: 'query'
    }
})

//query传参接收
this.queryName = this.$route.query.queryName
this.queryId = this.$route.query.queryId

最终不管是path引入还是name引入效果都一样如下图

5.1.2 params传递参数
注:使用params传参只能使用name进行引入
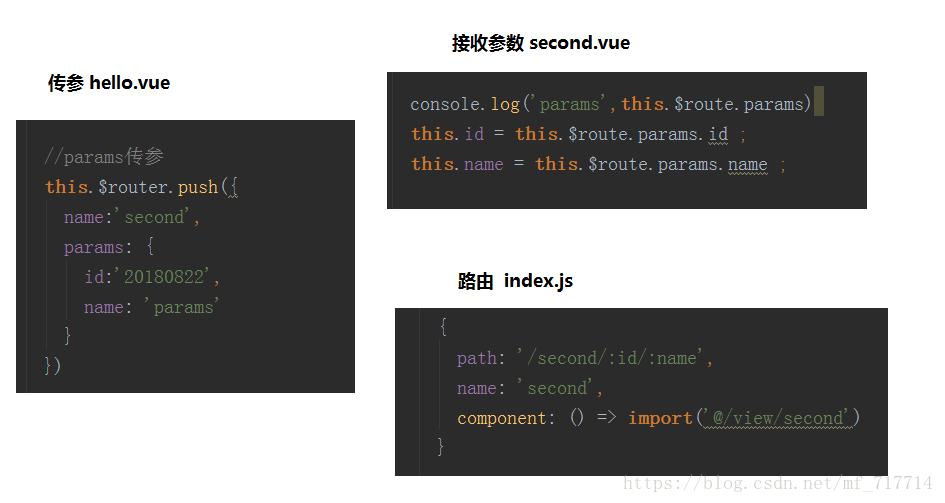
使用params传参
//params传参 使用name
this.$router.push({
  name:'second',
  params: {
    id:'20180822',
     name: 'query'
  }
})

//params接收参数
this.id = this.$route.params.id
this.name = this.$route.params.name

//路由

{
path: '/second/:id/:name',
name: 'second',
component: () => import('@/view/second')
}

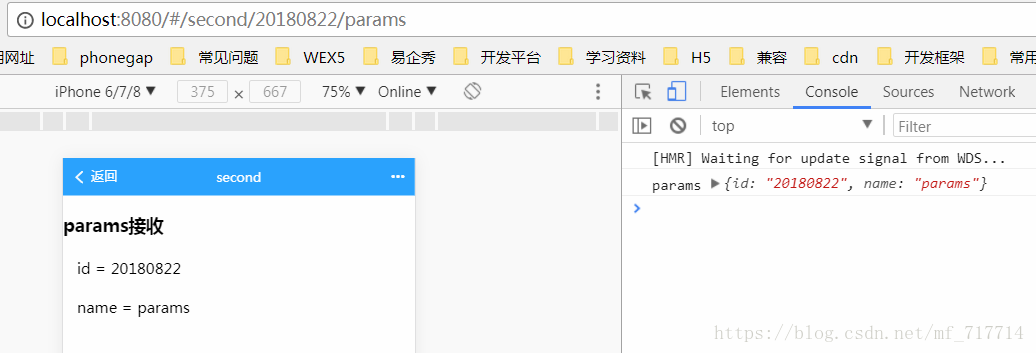
效果如下图

需要注意的是:
- params是路由的一部分,必须要在路由后面添加参数名。query是拼接在url后面的参数,没有也没关系。
- params一旦设置在路由,params就是路由的一部分,如果这个路由有params传参,但是在跳转的时候没有传这个参数, 会导致跳转失败或者页面会没有内容。
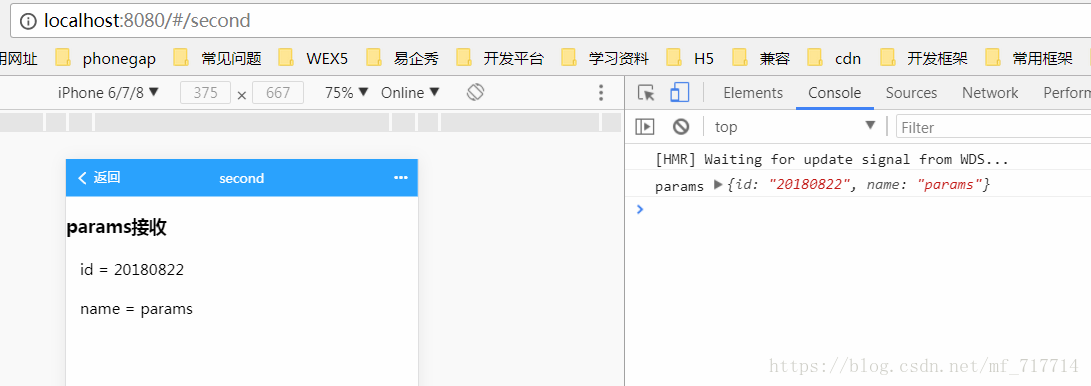
如果路由后面没有 /:id/:name效果如下图,地址栏没有参数

但是如果你刷新一下,就会发现页面失败,效果如下图

因此我们不可能让用户不要刷新,所以我们必须在路由后面加上 /:id/:name
如果使用path进行传参
//params传参 使用path
this.$router.push({
  path:'second',
   params: {
    id:'20180822',
     name: 'query'
  }
})

//params接收参数
this.id = this.$route.params.id
this.name = this.$route.params.name
效果如下图
使用path传参什么效果都没有。

5.1.3 总结
- 传参可以使用params和query两种方式。
- 使用params传参只能用name来引入路由,即push里面只能是name:’xxxx’,不能是path:’/xxx’, 因为params只能用name来引入路由,如果这里写成了path,接收参数页面会是undefined!!!。
- 使用query传参使用path来引入路由。
- params是路由的一部分,必须要在路由后面添加参数名。query是拼接在url后面的参数,没有也没关系。
- 二者还有点区别,直白的来说query相当于get请求,页面跳转的时候,可以在地址栏看到请求参数, 而params相当于post请求,参数不会再地址栏中显示。